


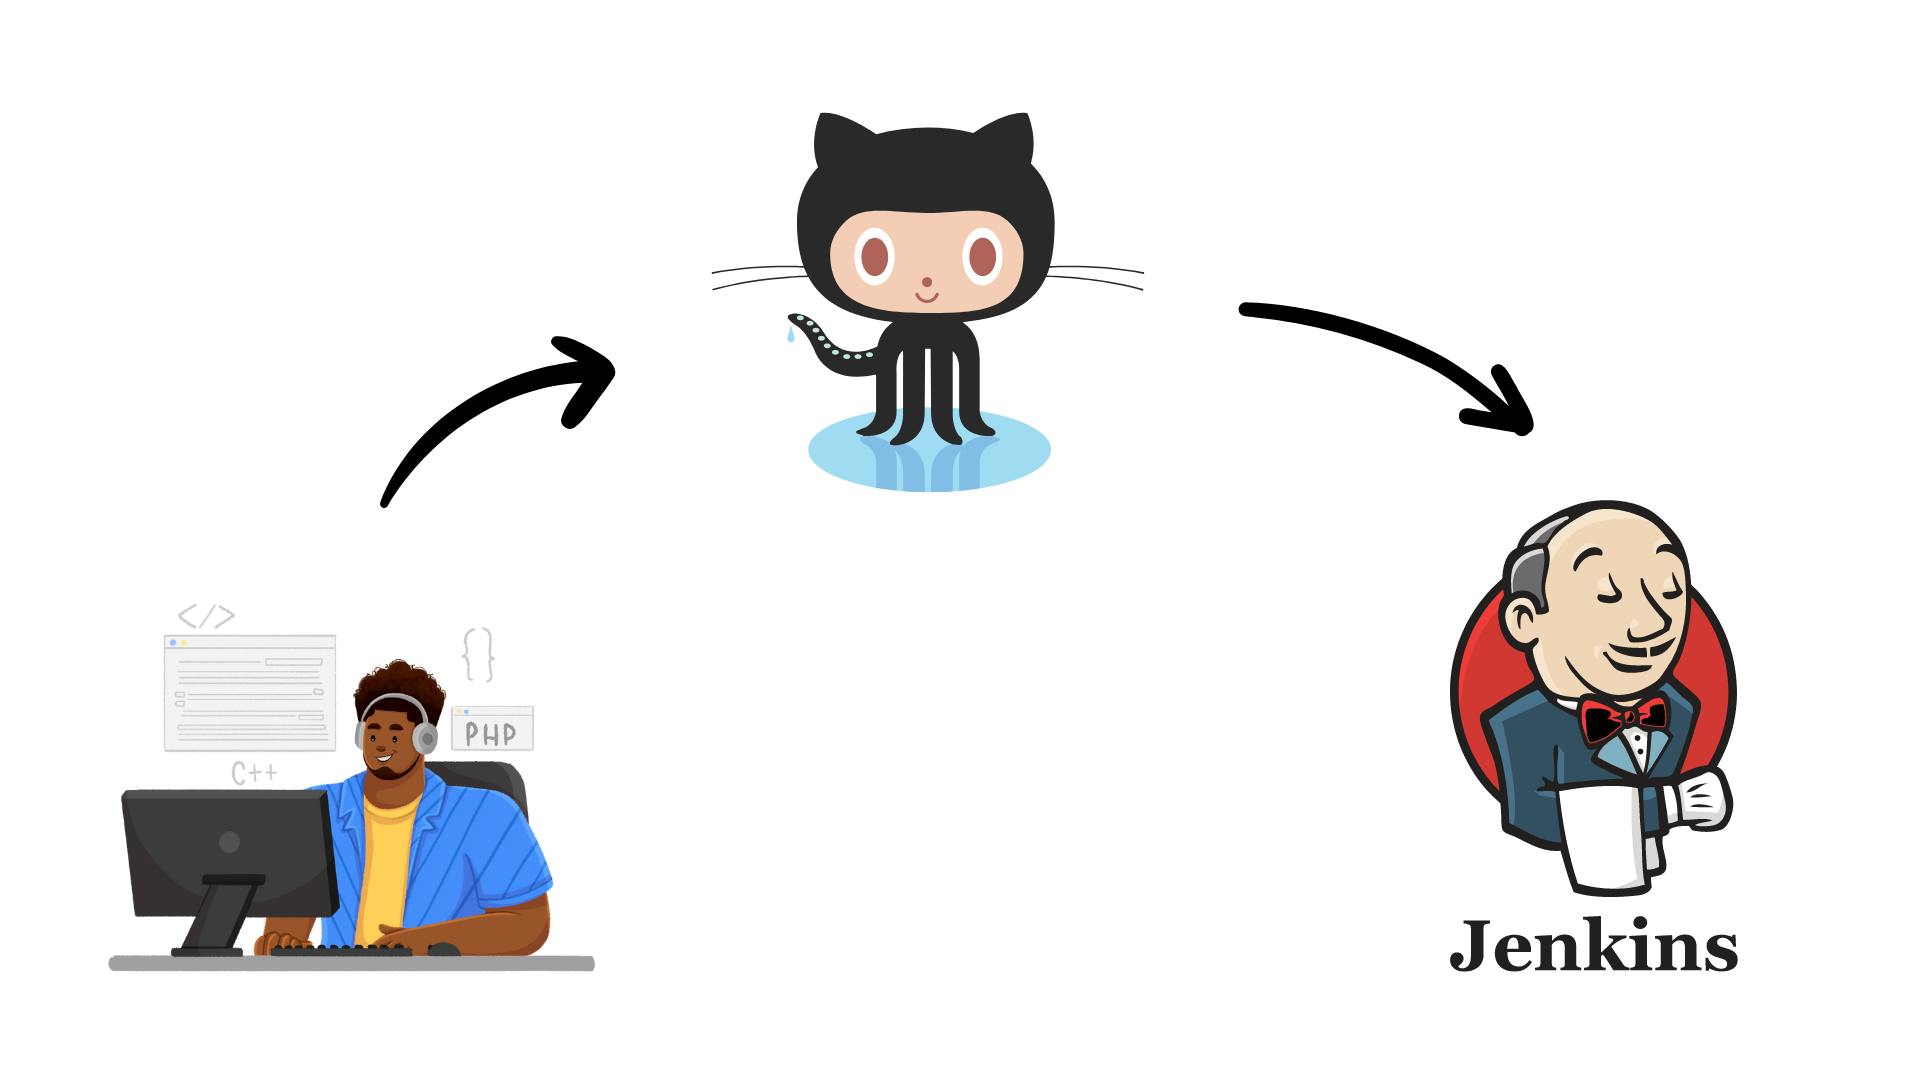
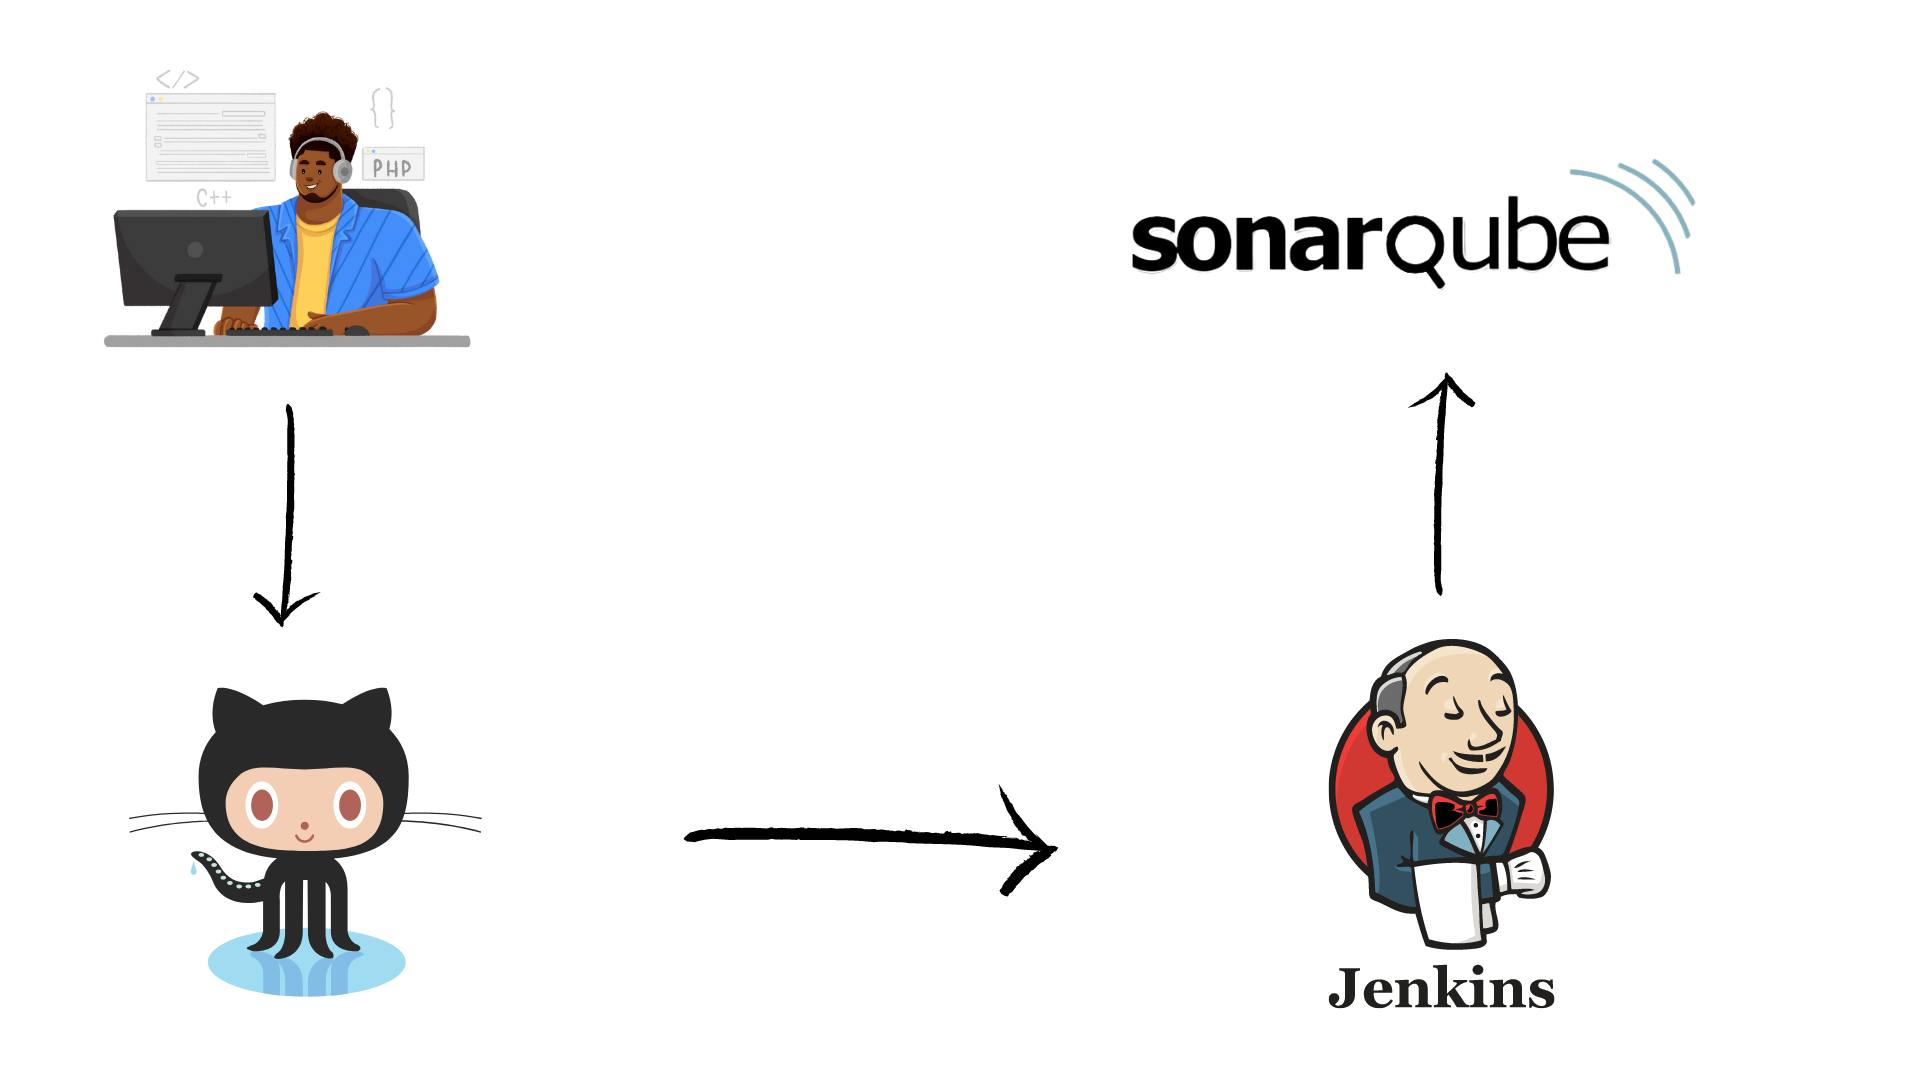
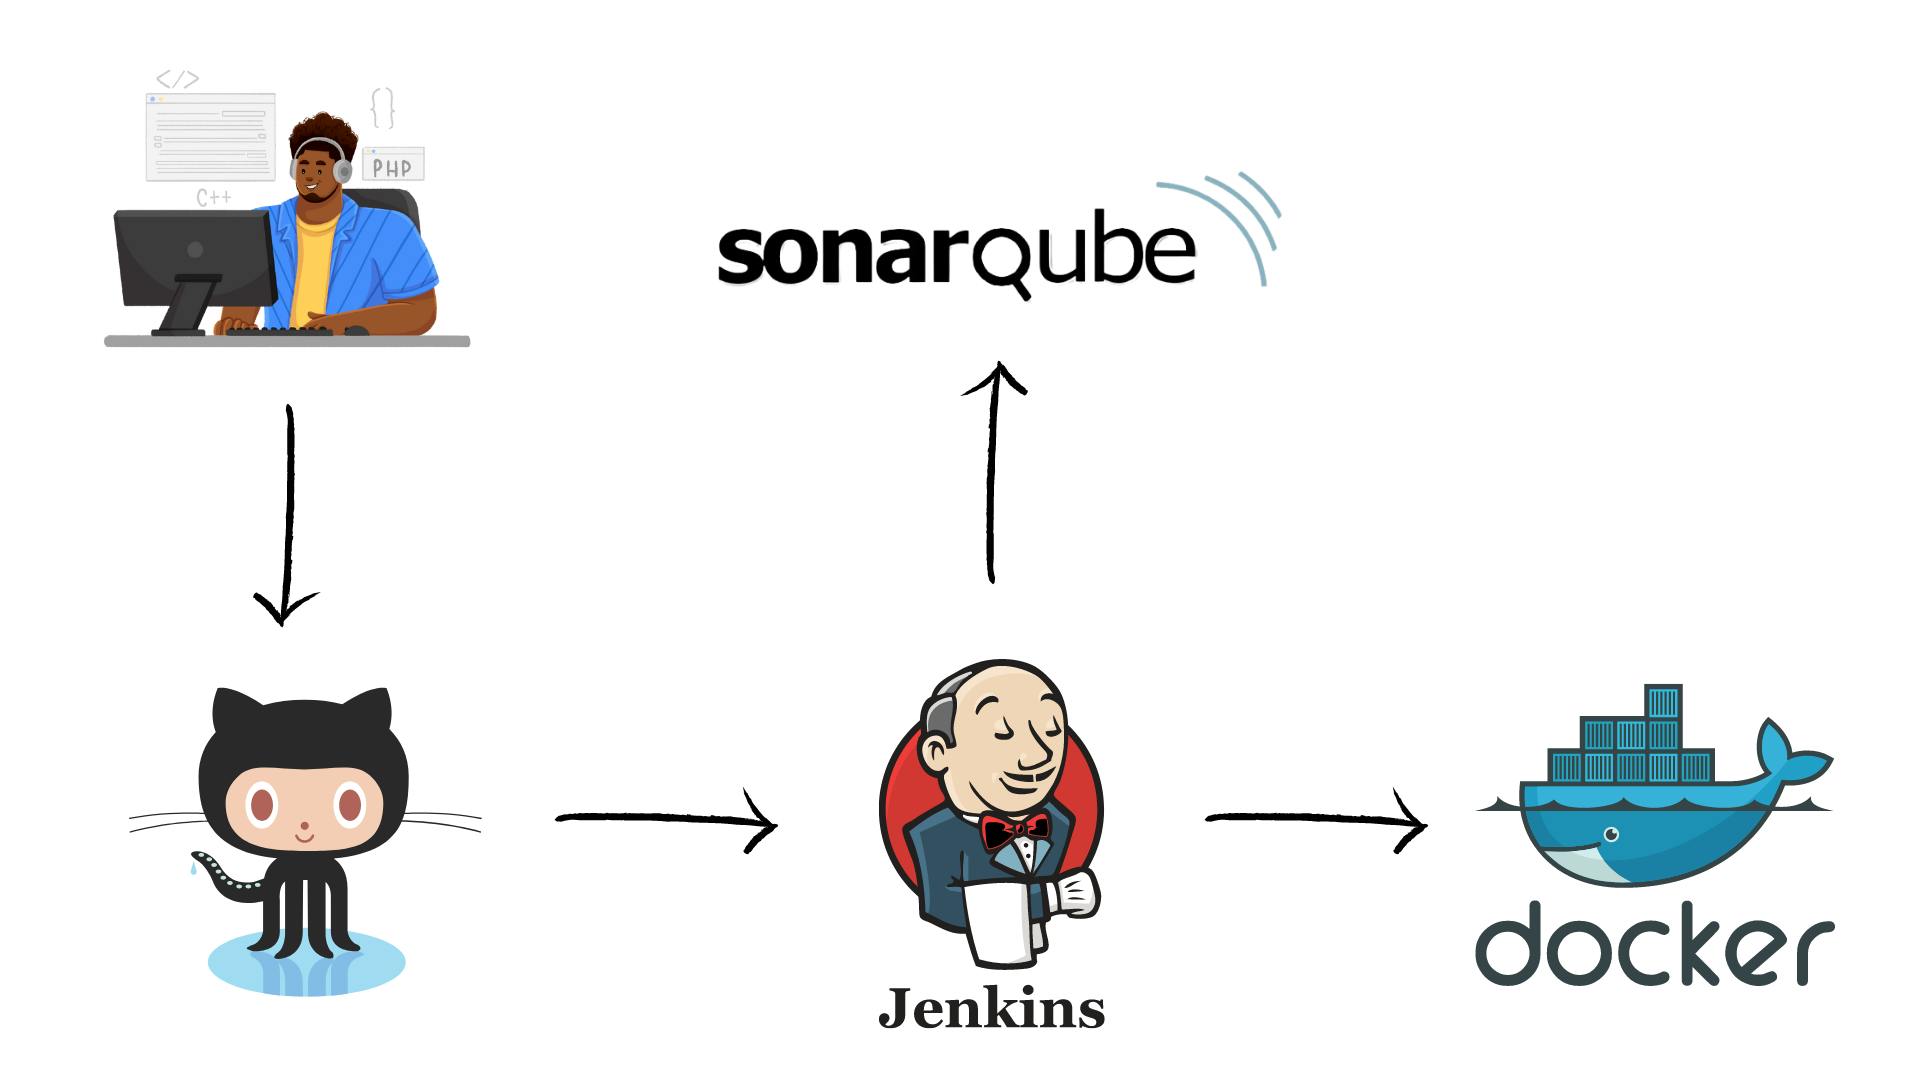
In this tutorial, we'll use Jenkins, SonarQube, Docker, and AWS to build an automated CI/CD pipeline for your web application. Every time you push new code to your GitHub repository, this pipeline will automatically build, test, analyze, and deploy your project to your AWS EC2 instance.
Prerequisite:
Account on GitHub
EC2 Instances knowledge and an AWS account
Understanding of SonarQube, Docker, and Jenkins
Steps to cover:
Create three EC2 instances with a security group that allows all traffic from the internet.
Install Jenkins, SonarQube, and Docker to each EC2 instance respectively.
Connect Jenkins instance to SonarQube, Docker instances, and to itself also through SSH.
Make those SSH connections password-less generating an ssh-key and saving their IDs.
Install plugin - SSH2 Easy on Jenkins and set server.
Set server groups and server sites of Jenkins, SonarQube, and Docker.
Create a new job at Jenkins and add a git link for your repository with the branch you want to build and deploy.
Add build steps in configuring the pipeline to copy code from Jenkins workspace to SonarQube and Docker instance for analysis and deployment.
Creating EC2 Instances
If you are new to AWS, you can refer to this for creating your account on AWS.
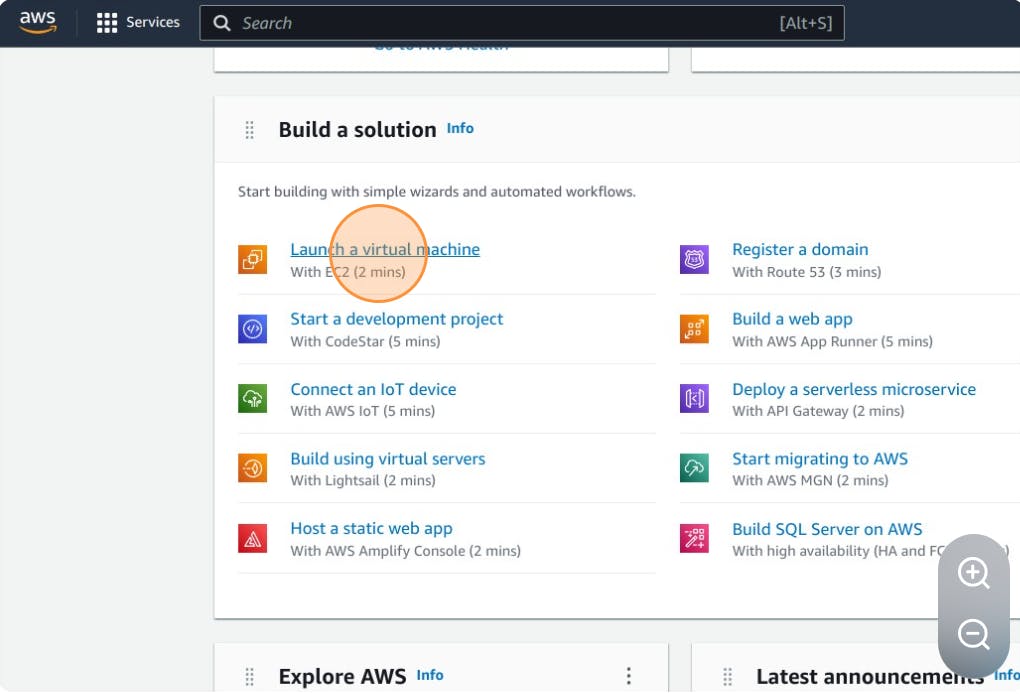
- Now, on the AWS dashboard click on
"Launch a virtual machine"
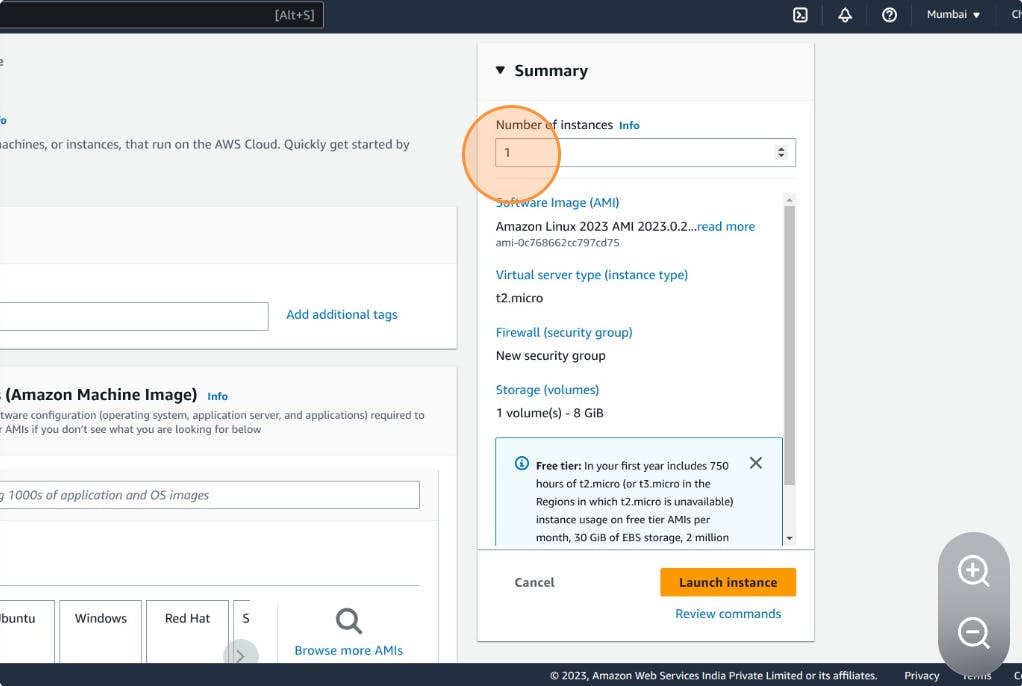
- Double-click the
"Number of instances"field and type 3.
Temporarily name them "Instances".
Select Ubuntu virtual machine.

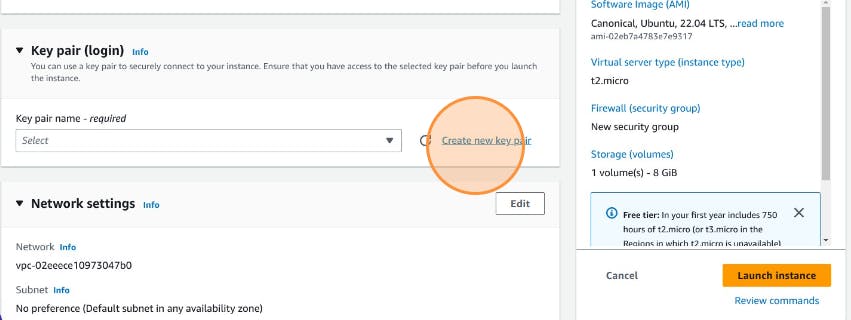
- Click
"Create new key pair", and name it "Jenkins" and download it with RSA (key pair type) and .pem (private key pair type) format.
Now finally, click on Launch Instance.
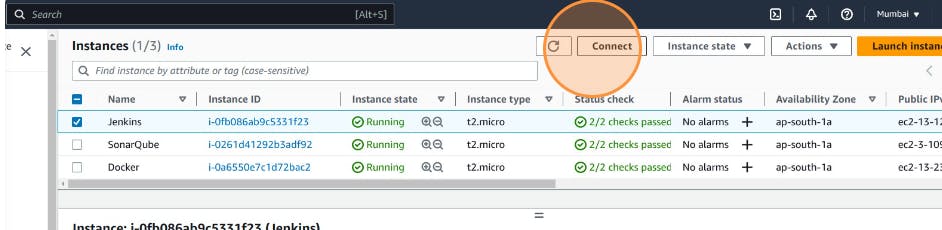
Now, redirect to the Instances page and rename them Jenkins, SonarQube, and Docker respectively.

Setting Security Group
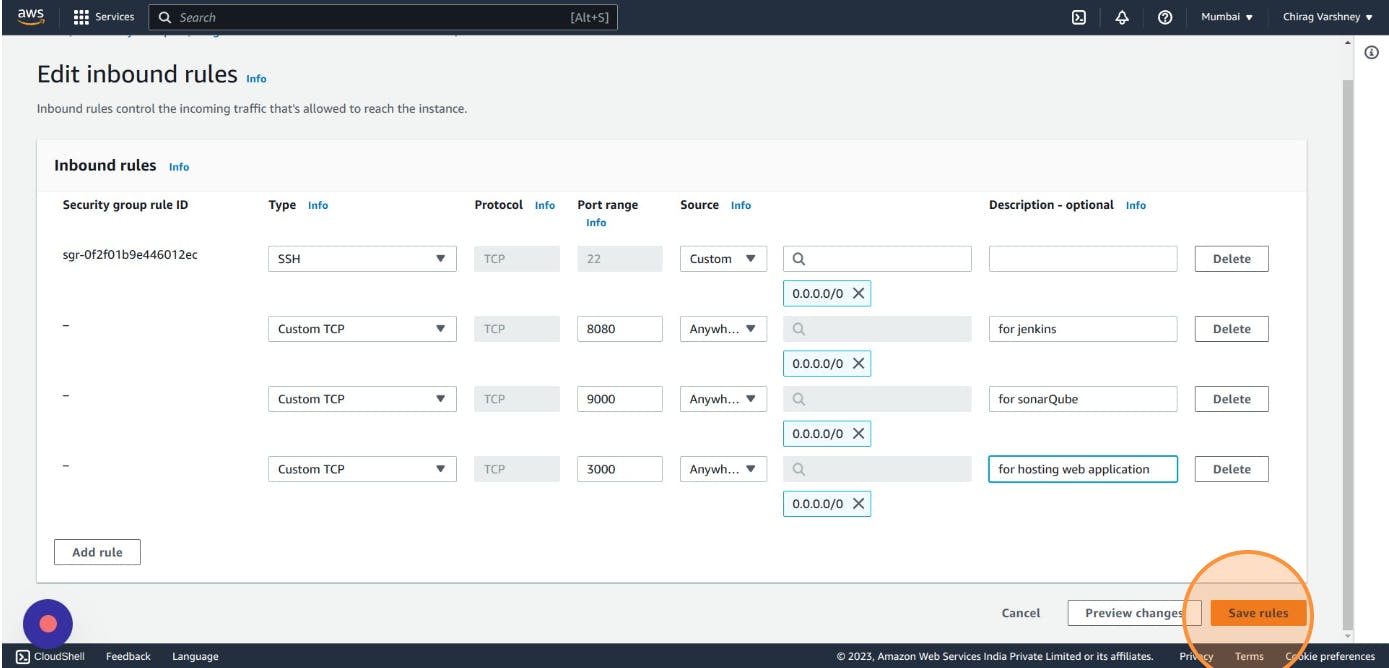
Under the security details for instance, click on security groups and then click on "Edit Inbound rules".
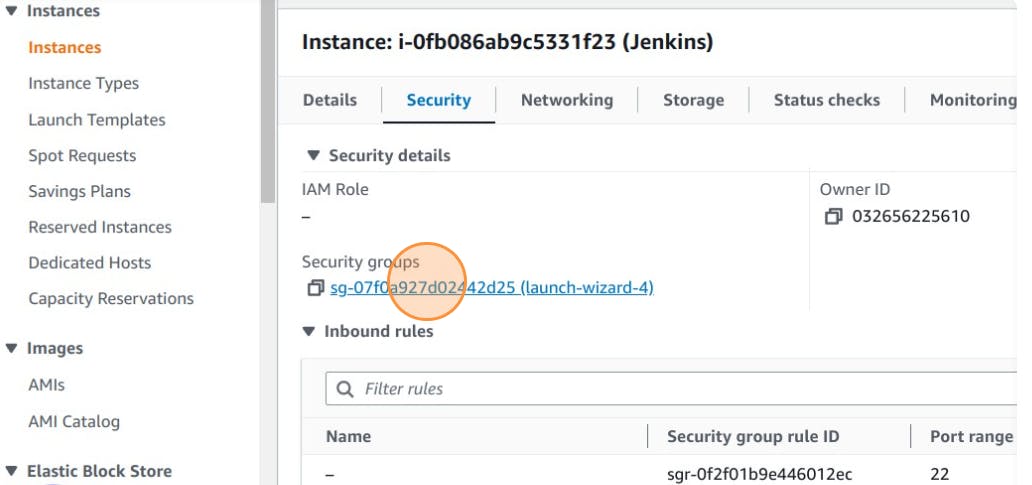
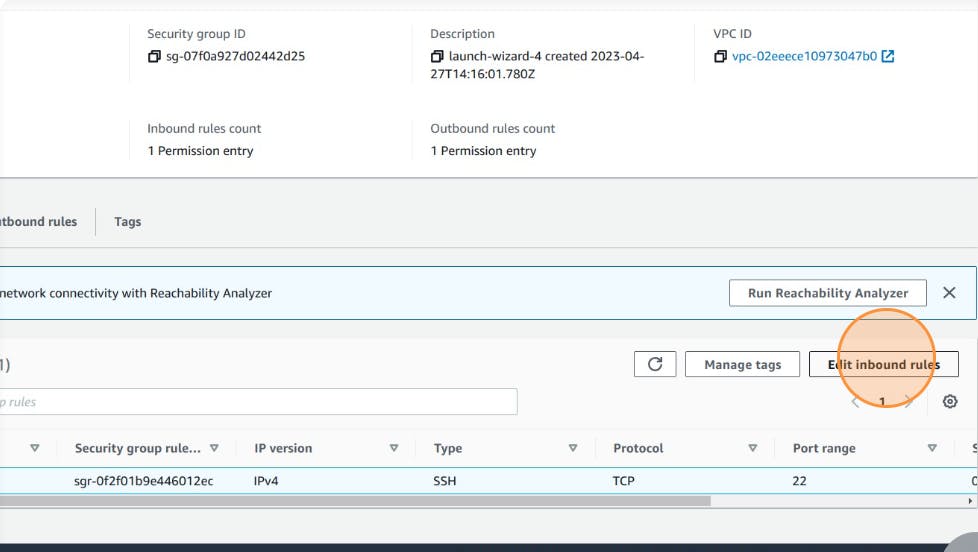
Generally, there is only one rule present for port 22 for SSH.
We have to add some more rules as:
Port 8080, for Jenkins
Port 3000, for exposing our web application
Port 9000, for SonarQube
Set the source to "Anywhere-IPv4" i.e. 0.0.0.0/0
Now, click on save rules to save your changes.
Setting up Instances
Installing Jenkins on the EC2 Instance
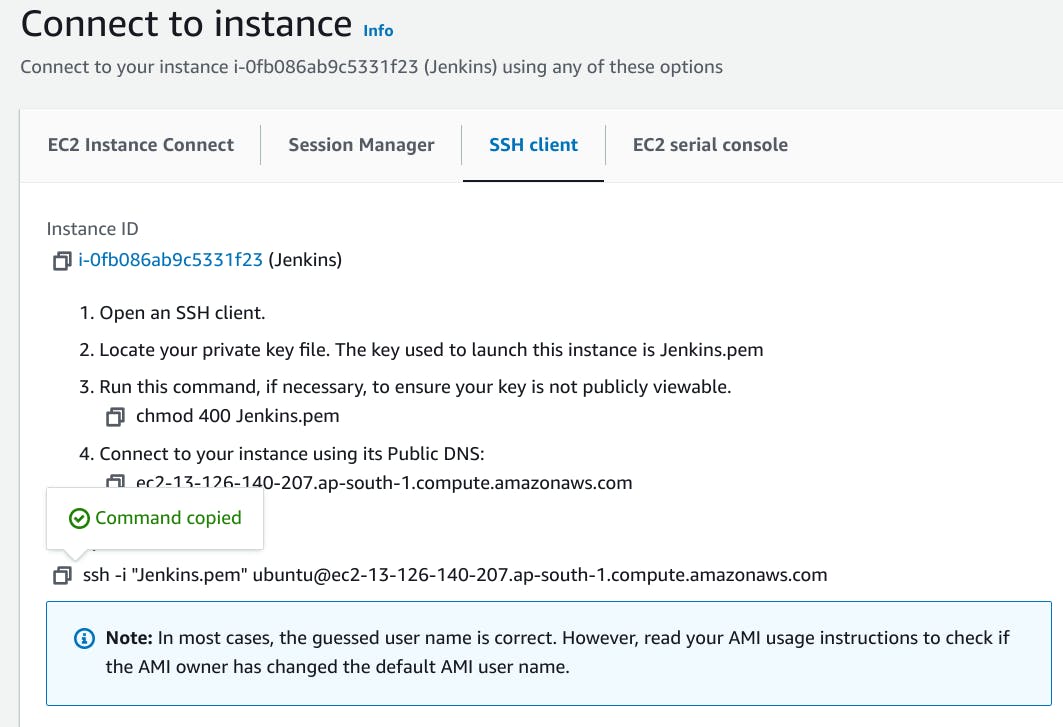
To install Jenkins on the Jenkins instance, firstly you have to ssh to your instance in your terminal by selecting that instance and then clicking on connect.
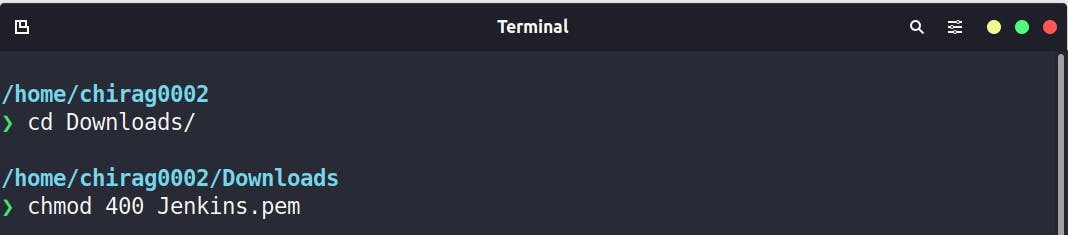
Paste this command
chmod 400 Jenkins.pemin your downloads directory where you downloaded Jenkins.pem file to ensure your key is not publicly viewable.
Now under SSH client, copy the ssh command and paste it to your terminal...

To install Jenkins run the following commands in your terminal:
sudo apt update
sudo apt install openjdk-11-jre
curl -fsSL https://pkg.jenkins.io/debian-stable/jenkins.io-2023.key | sudo tee \
  /usr/share/keyrings/jenkins-keyring.asc > /dev/null
echo deb [signed-by=/usr/share/keyrings/jenkins-keyring.asc] \
  https://pkg.jenkins.io/debian-stable binary/ | sudo tee \
  /etc/apt/sources.list.d/jenkins.list > /dev/null
sudo apt-get update
sudo apt-get install jenkins
You can check the status of Jenkins by the following command
sudo systemctl status jenkins
Now, copy the public IPv4 address of Jenkins, paste it into your browser, and put the port number 8080 after it in the format i.e <ip_address>:8080
For ex. - 13.126.140.207:8080

You'll see a page asking for Unlock Jenkins,
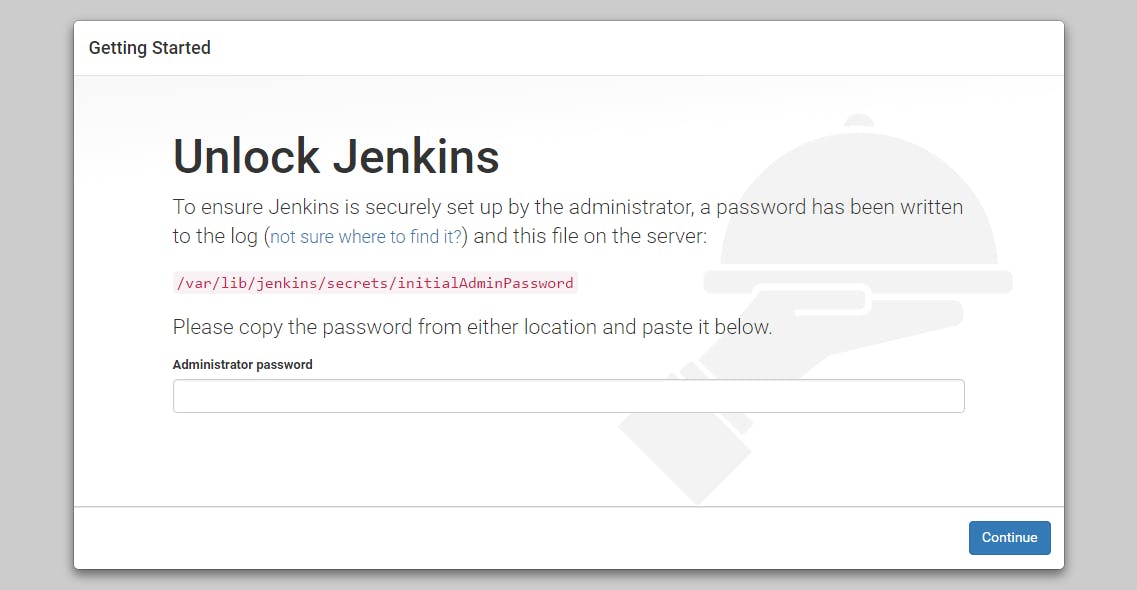
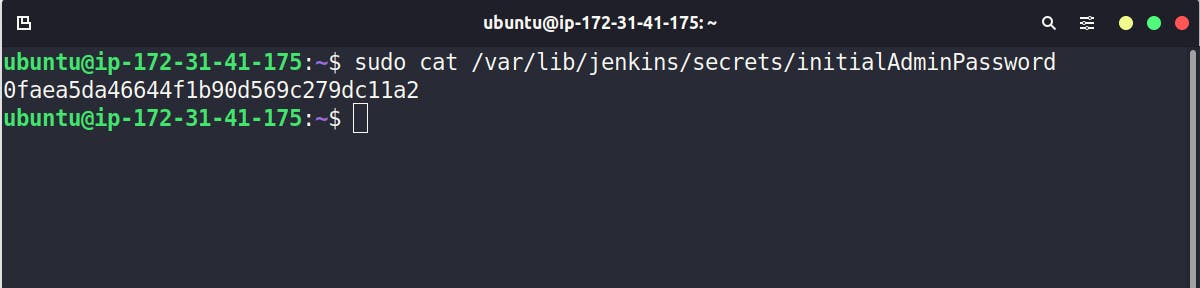
To unlock jenkins paste the secret key to Administrator password, you can get it with the following command:
sudo cat /var/lib/jenkins/secrets/initialAdminPassword
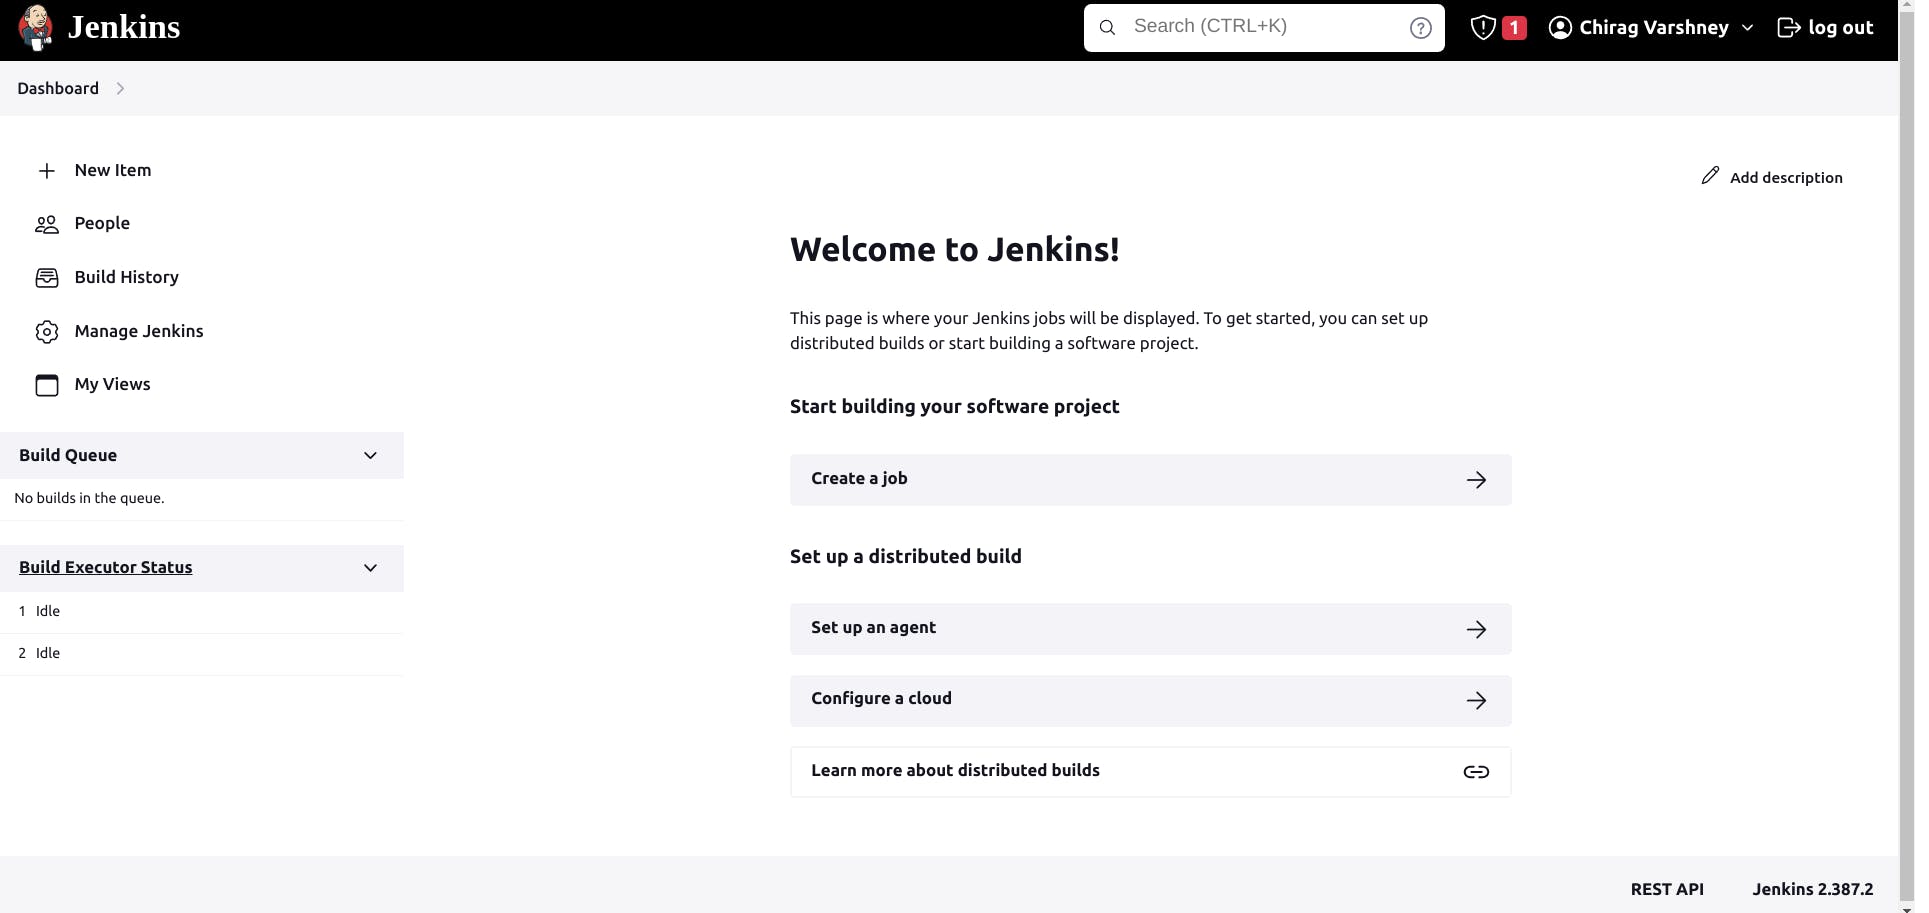
After unlocking Jenkins click on "Install suggested plugins" and then provide the basic details on the "Create First Admin User" page and get to the Jenkins dashboard after completing all the required steps.
Installing SonarQube on the EC2 Instance
SonarQube is a self-managed, automatic code review tool that systematically helps you deliver clean code. As a core element of our Sonar solution, SonarQube integrates into your existing workflow and detects issues in your code to help you perform continuous code inspections of your projects.
Repeat the process in the new terminal to ssh to your instance that we executed during Jenkins installation.
To install SonarQube to your instance run the following command in your terminal:
sudo apt update
sudo apt install openjdk-17-jre
wget https://binaries.sonarsource.com/Distribution/sonarqube/sonarqube-10.0.0.68432.zip
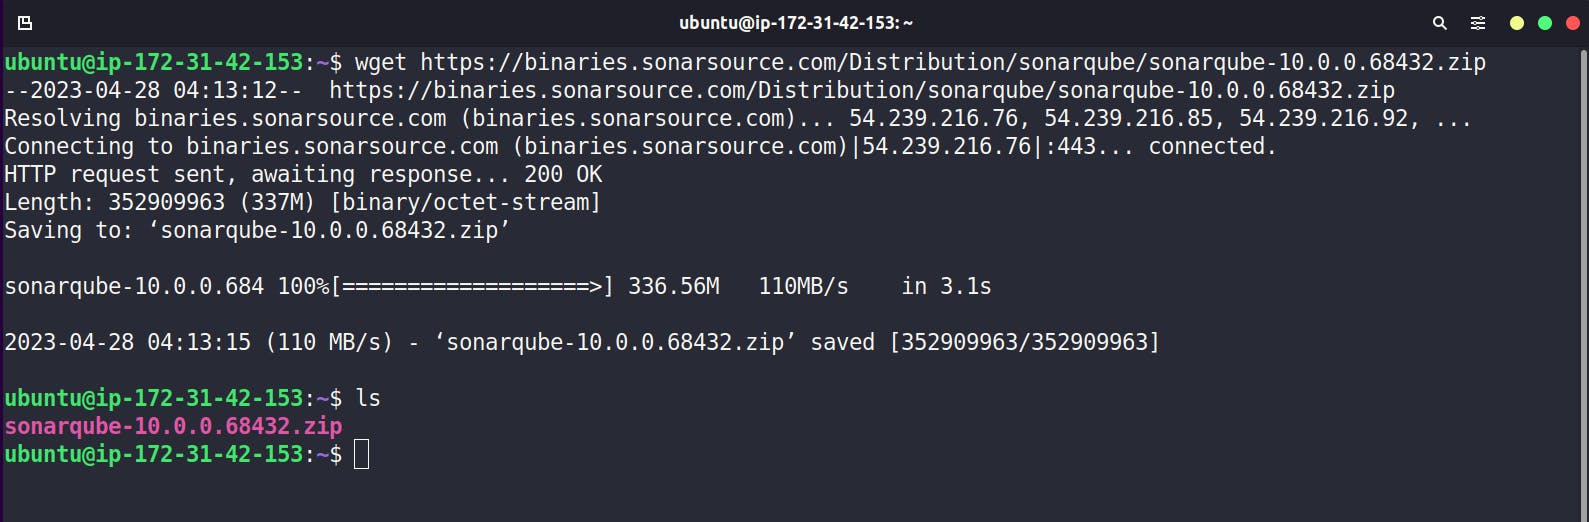
To unzip the zip file, run the following command:
sudo apt install unzip
unzip sonarqube-10.0.0.68432.zip
Now, head over to the Linux directory to execute the installation file:
cd /home/ubuntu/sonarqube-10.0.0.68432/bin/linux-x86-64
./sonar.sh console
#this will start the SonarQube on port 9000
Installing Docker on the EC2 Instance
To install docker, you have to repeat the process you executed at the time of Jenkins and SonarQube installation. You have to ssh into your instance through your terminal.
Now, to install the Docker in your Docker instance, run the following commands given below.
Update the apt package index and install packages to allow apt to use a repository over HTTPS:
sudo apt-get update
sudo apt-get install \
    ca-certificates \
    curl \
    gnupg
Add Docker’s official GPG key:
sudo install -m 0755 -d /etc/apt/keyrings
curl -fsSL https://download.docker.com/linux/ubuntu/gpg | sudo gpg --dearmor -o /etc/apt/keyrings/docker.gpg
sudo chmod a+r /etc/apt/keyrings/docker.gpg
Use the following command to set up the repository:
echo \
  "deb [arch="$(dpkg --print-architecture)" signed-by=/etc/apt/keyrings/docker.gpg] https://download.docker.com/linux/ubuntu \
  "$(. /etc/os-release && echo "$VERSION_CODENAME")" stable" | \
sudo tee /etc/apt/sources.list.d/docker.list > /dev/null
To install the latest version, run:
sudo apt-get install docker-ce docker-ce-cli containerd.io docker-buildx-plugin docker-compose-plugin
Verify that the Docker Engine installation is successful by running the hello-world image:
sudo docker run hello-world
Now, we want to use docker services without the sudo command. So, in order to do so, we have to add this current "ubuntu" user to the docker group.
sudo usermod -aG docker ubuntu
newgrp docker
Now, you can use docker services without sudo command.
Connecting to Jenkins, SonarQube, and Docker through SSH
We have to set the SSH connection from Jenkins to Jenkins, Jenkins to SonarQube, and Jenkins to Docker for further processing. Also, we have to make these connections smooth by generating an ssh key and saving their Ids.
Follow these commands to do so:
sudo su
#this will eneter you into root environment

vi /etc/ssh/sshd_config
#you have to edit and make some changes in ssh config file to make ssh connection successful
After getting inside of sshd_config file, press "i" to get edit access and then make these following changes in your file.
To save these changes and exit, press ":wq!"
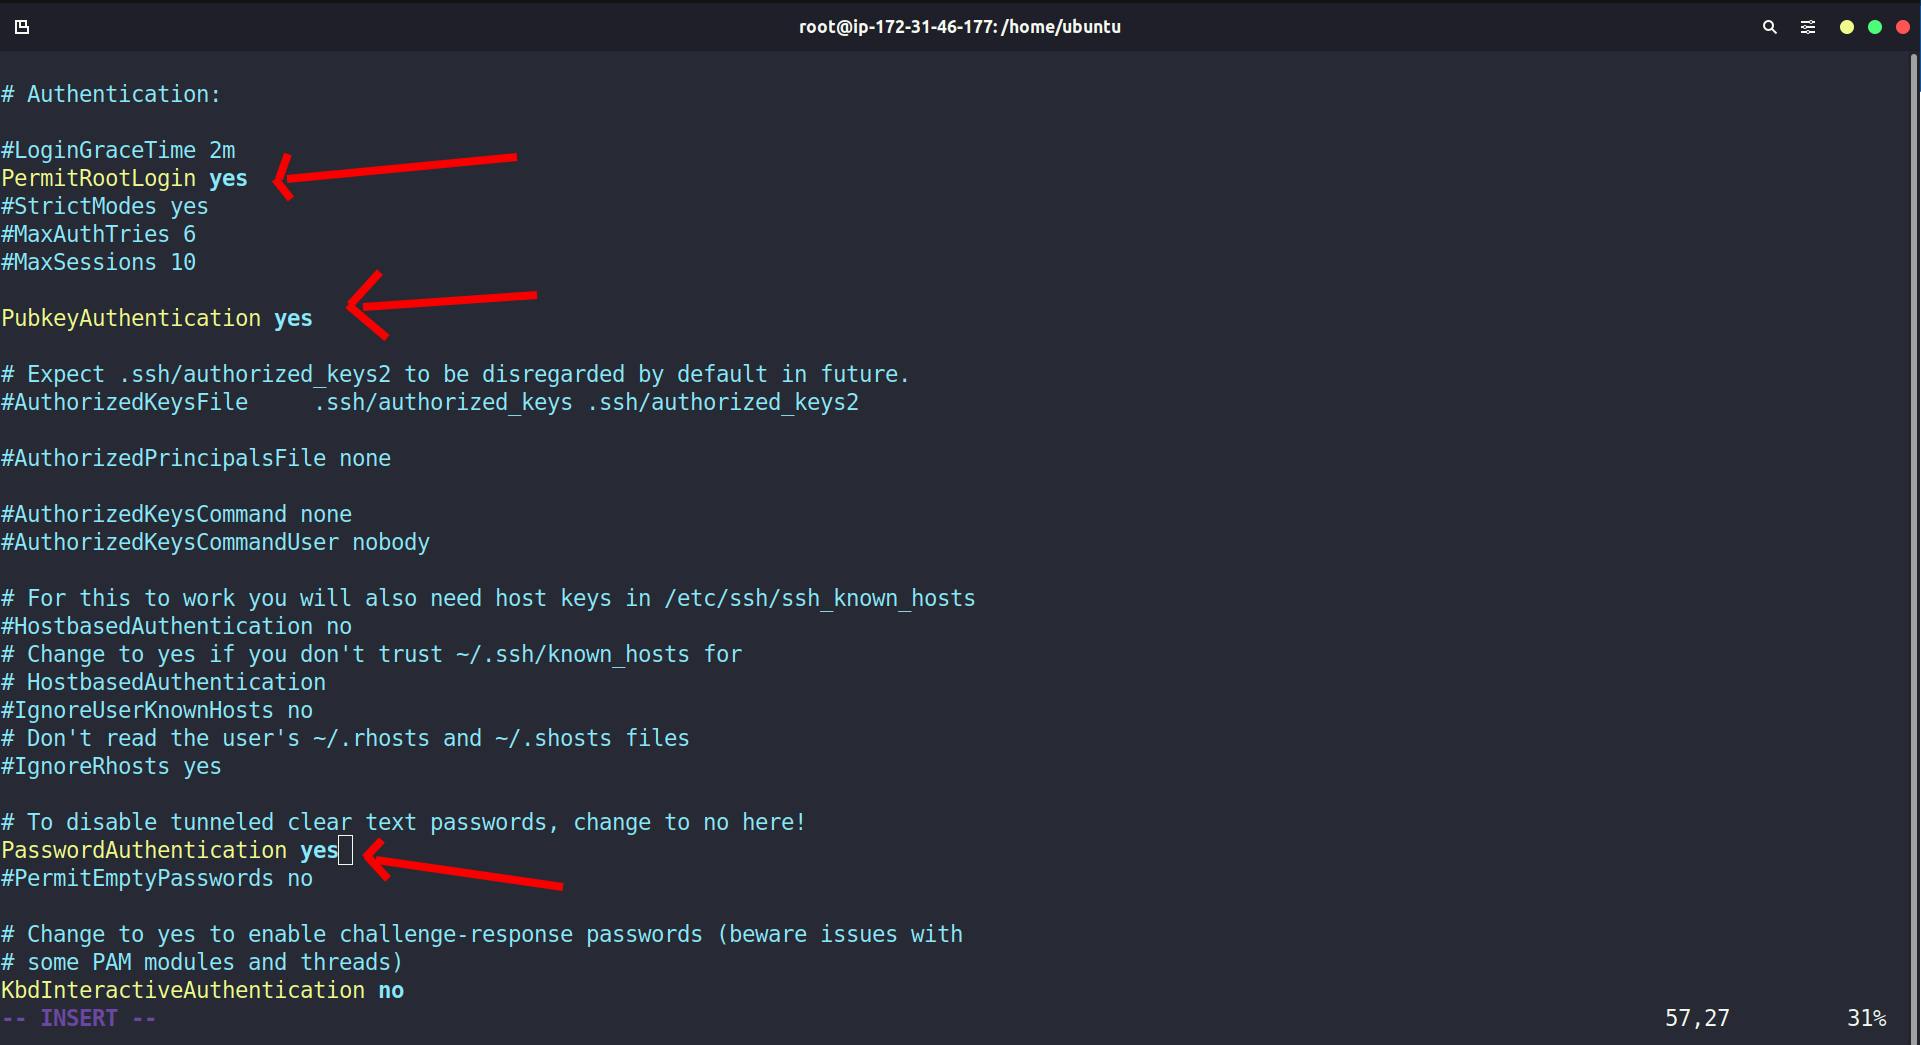
systemctl restart sshd
#this will restart sshd services

exit
#this will make exit from root environment
Now, you have to set a password to your instance for authentication.
sudo passwd ubuntu

You have to repeat the above process in all the three instances.
After completing the above process in all three instances, connect to your Jenkins instance in your terminal and run the following command to set up a connection from Jenkins to Jenkins, SonarQube, and Docker.
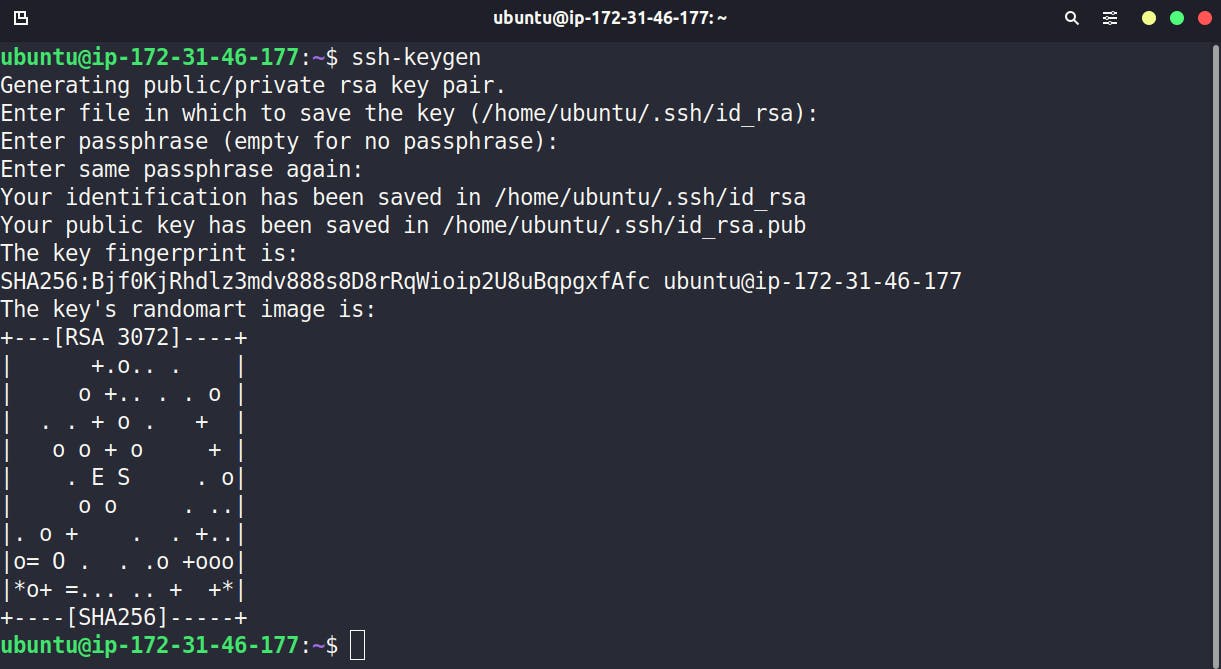
ssh-keygen
#this will generate a ssh key in which we will going to save our ssh Ids of other instances to make them passwordless.
Press enter for all the fields.
Now , this below process has to be repeated again for all three Public IPs of Jenkins, SonarQube and Docker in Jenkins instance only.
I'm showing this with Docker Public IP, but you have to do it with all three.
ssh 65.1.131.68
#ssh <Docker's Public IP> or ssh <SonarQube's Public IP> or ssh <Jenkins Public IP>
This will ask for a password that you set earlier.
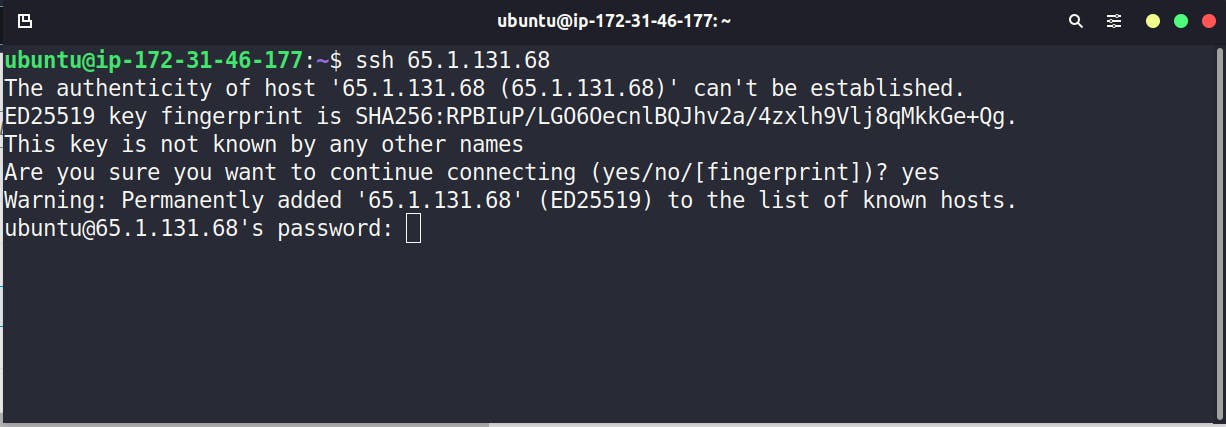
After successful authentication, you will get to login to your instance from Jenkins to that particular instance whose Public IP you have entered above.
Now, type exit to log out.

Now we have to make this connection passwordless as we do not want to enter the password again and again.
ssh-copy-id ubuntu@65.1.131.68
#this will save the Id of above IP and make it secure so that it will not ask password for the next time when you try to ssh again.
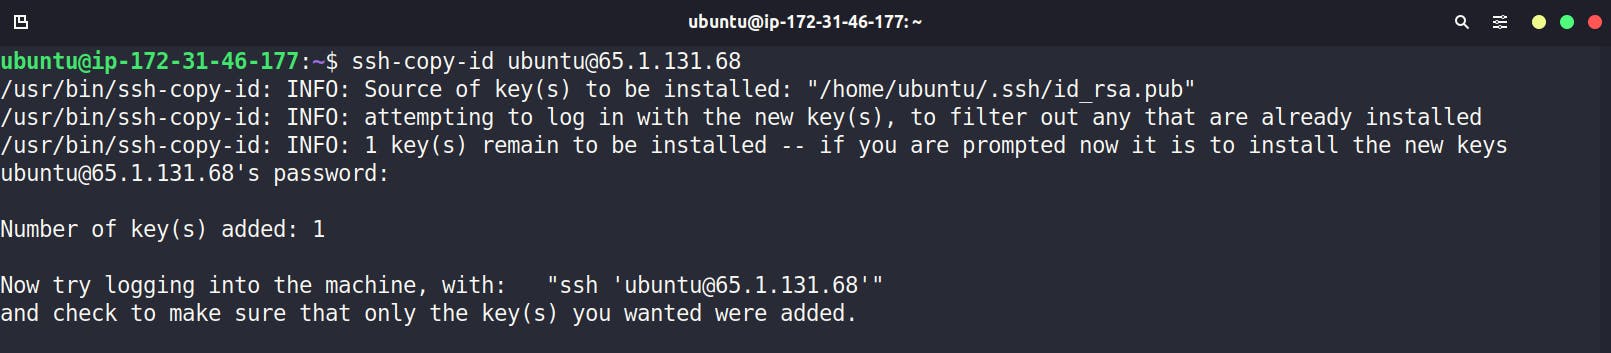
This will ask for a password, and after this it becomes passwordless. You can verify it by command ssh 65.1.131.68 , you'll see this time it gets login without asking for a password.
After repeating this above process with remaining two Public IPs of Jenkins and SonarQube, head over to AWS Instances dashboard on your browser.
Integrating SonarQube For Jenkins
Copy the Public IP of SonarQube and paste it on the browser and put port 9000 after it in such format <public IP>:9000
For ex. - 65.0.3.87:9000
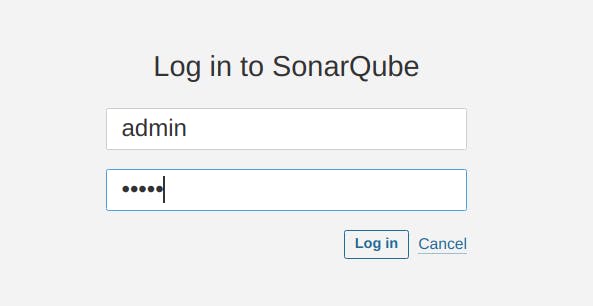
Now, login with username - admin & password - admin
After login and changing your password, you'll land on the SonarQube dashboard.
Click this icon.
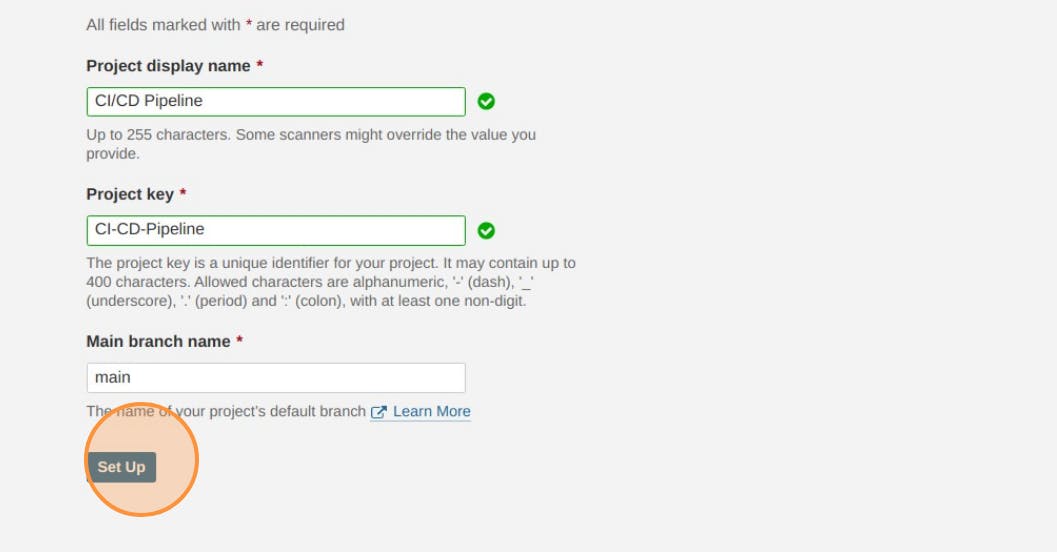
Give a name to your Project and provide the name of the branch you want to analyze.
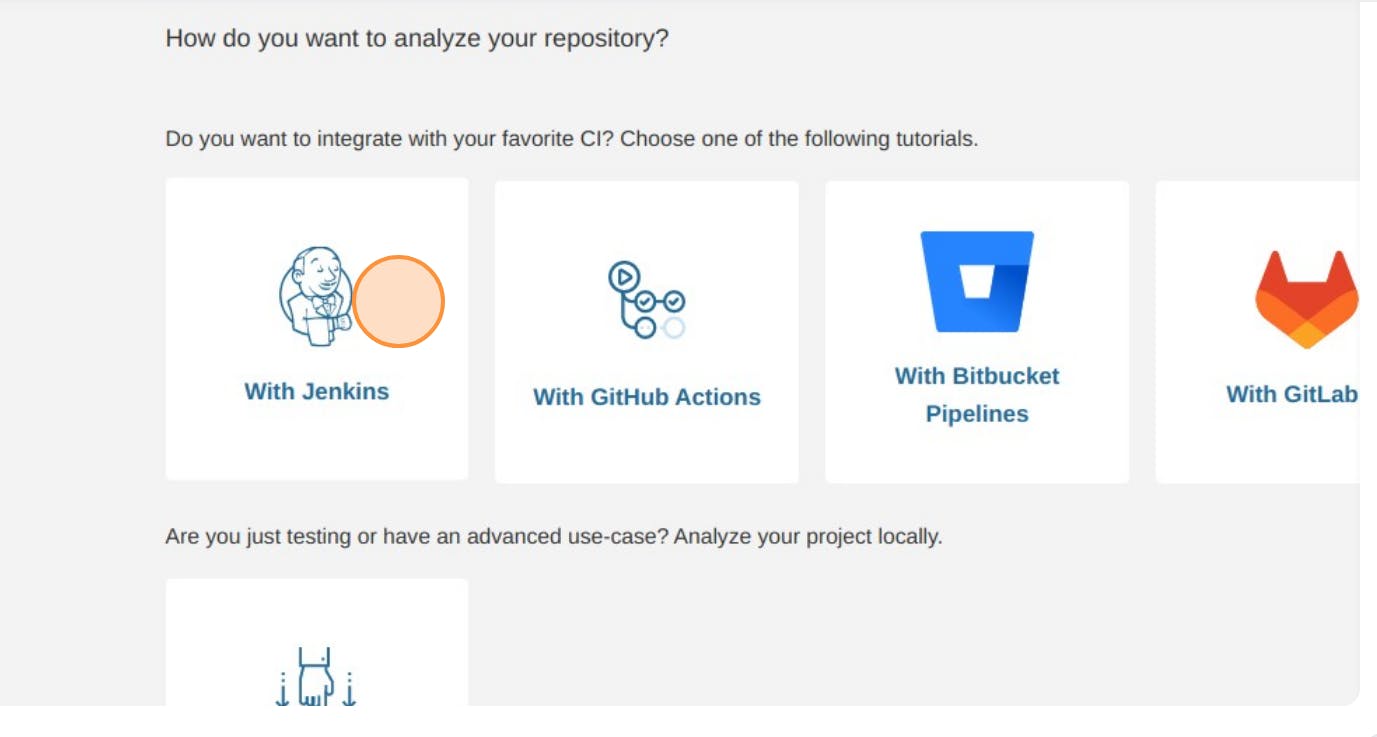
Now, we have many options to select for Continuous Integration tools. For now, we will move forward with Jenkins.
On the next page, we'll choose GitHub for the DevOps platform.

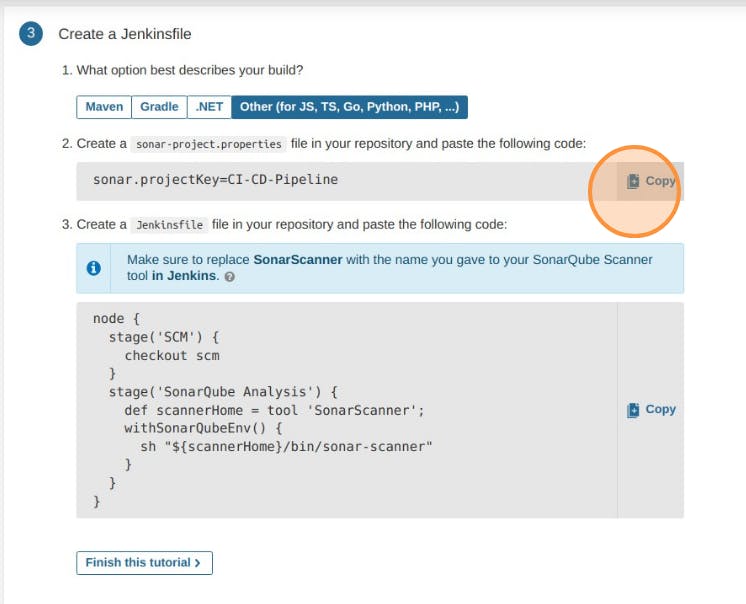
Now, it will ask for configuration. Click continue up to the 3rd step and select other as we are going to deploy our HTML application. Copy the code that it is providing and save it somewhere safe as we will going to use it later.
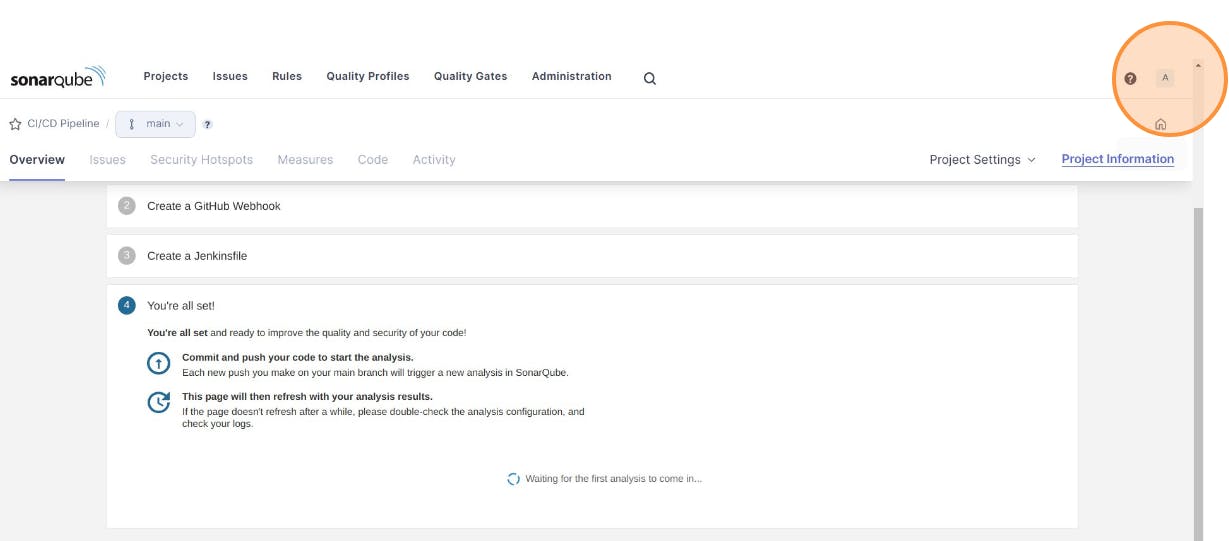
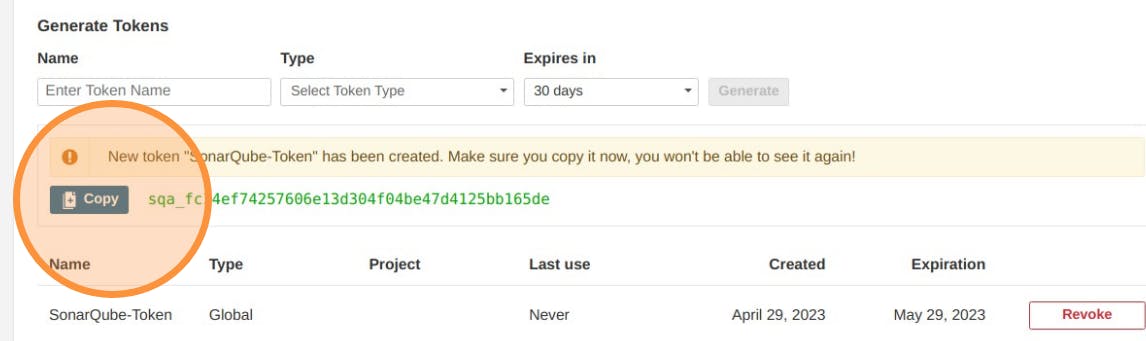
Click on Finish this tutorial to save it, and after saving it move to My Accounts>Security>Generate Tokens
Now, create a Token for integrating with Jenkins.
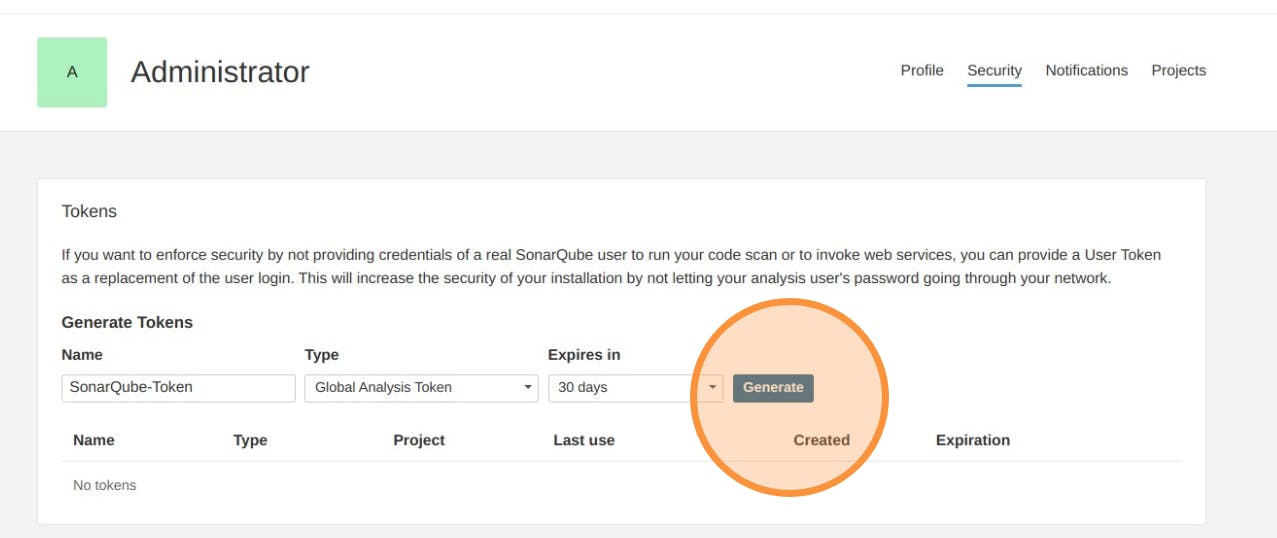
Copy the token and save it somewhere safe, as we are going to use it later.
Now, head over to Jenkins Dashboard, by pasting the Public IP of Jenkins and put port 8080 after it in such fromat <Public IP>:8080
Manage Plugins
We have to install some plugins on Jenkins for setting up SonarQube and Docker.
SonarQube Scanner
On Jenkins Dashboard, click on Manage Jenkins>>Manage Plugins>>Available Plugins
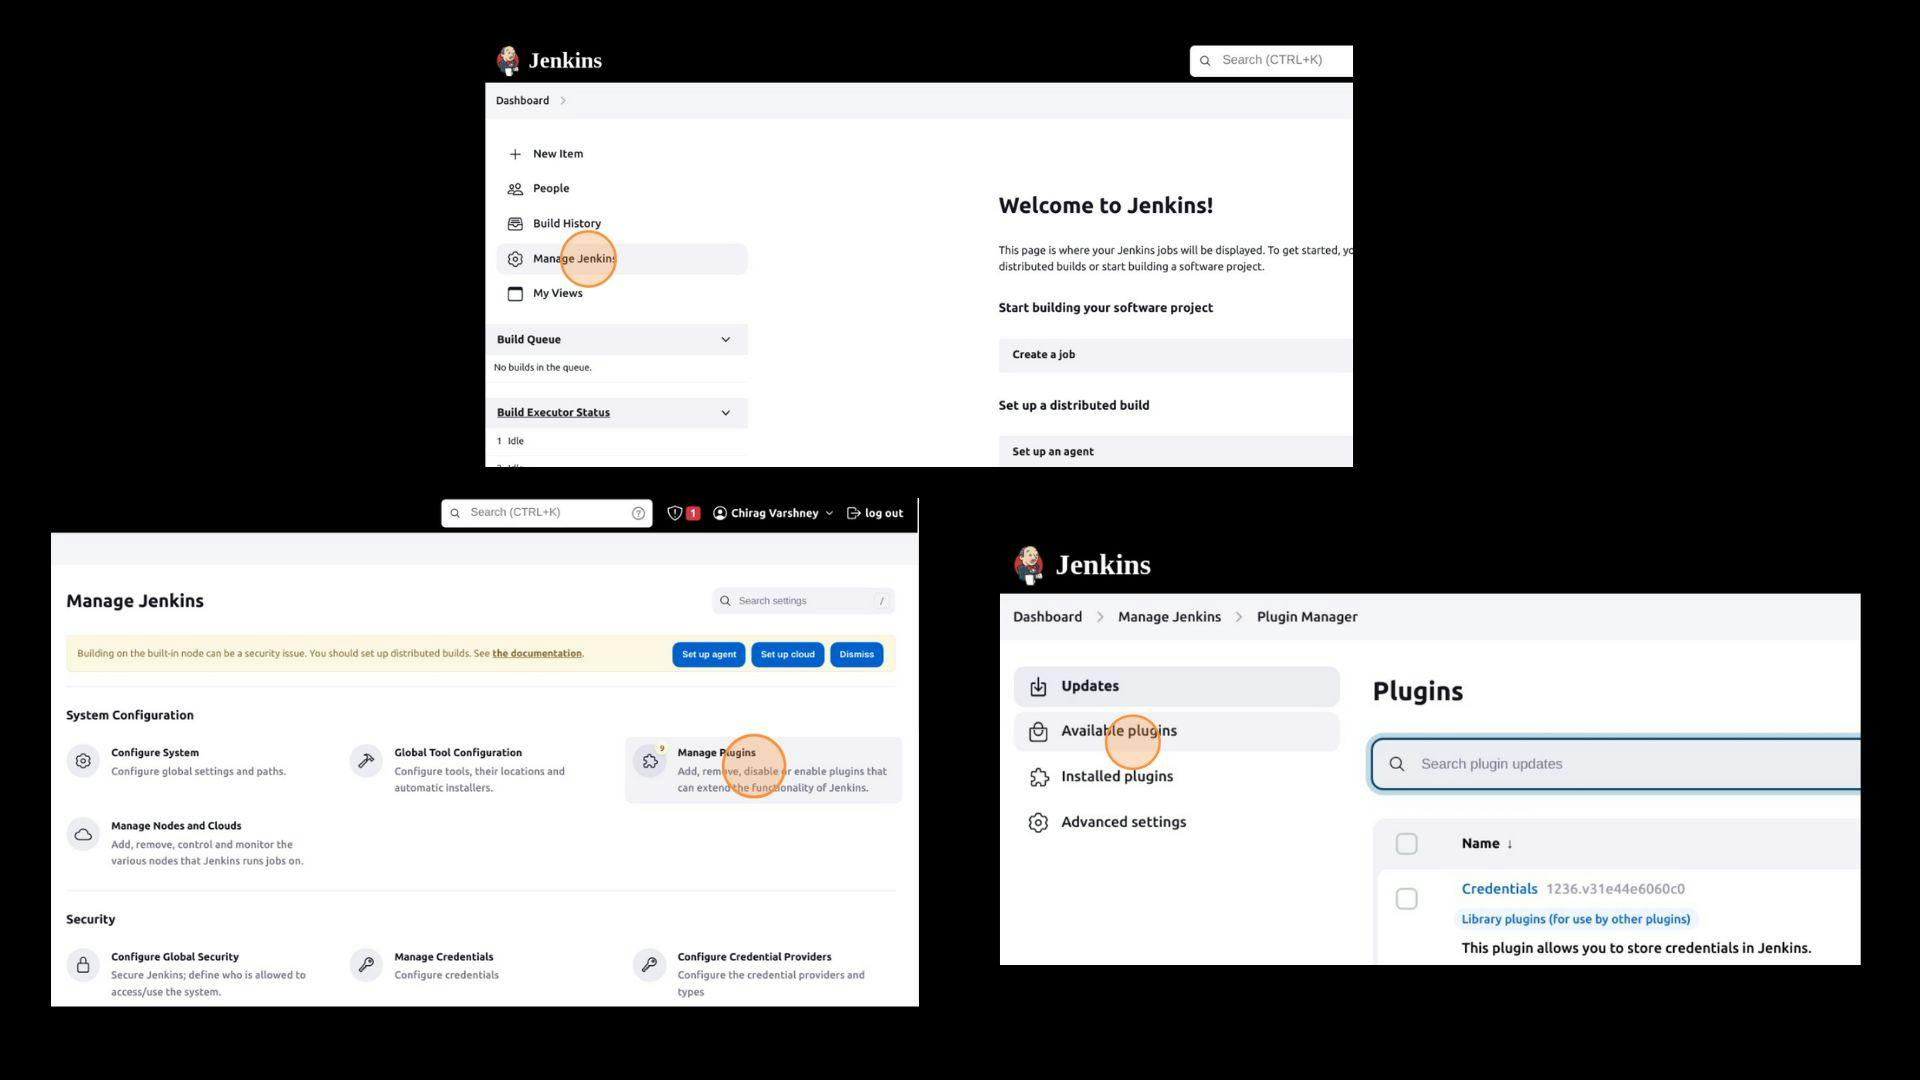
Now, in Available Plugins, search for SonarQube Scanner and SSH2 Easy.
After selecting them click on "Install without restart".

Now, we have to configure some plugins and servers, so that all three instances can connect through.
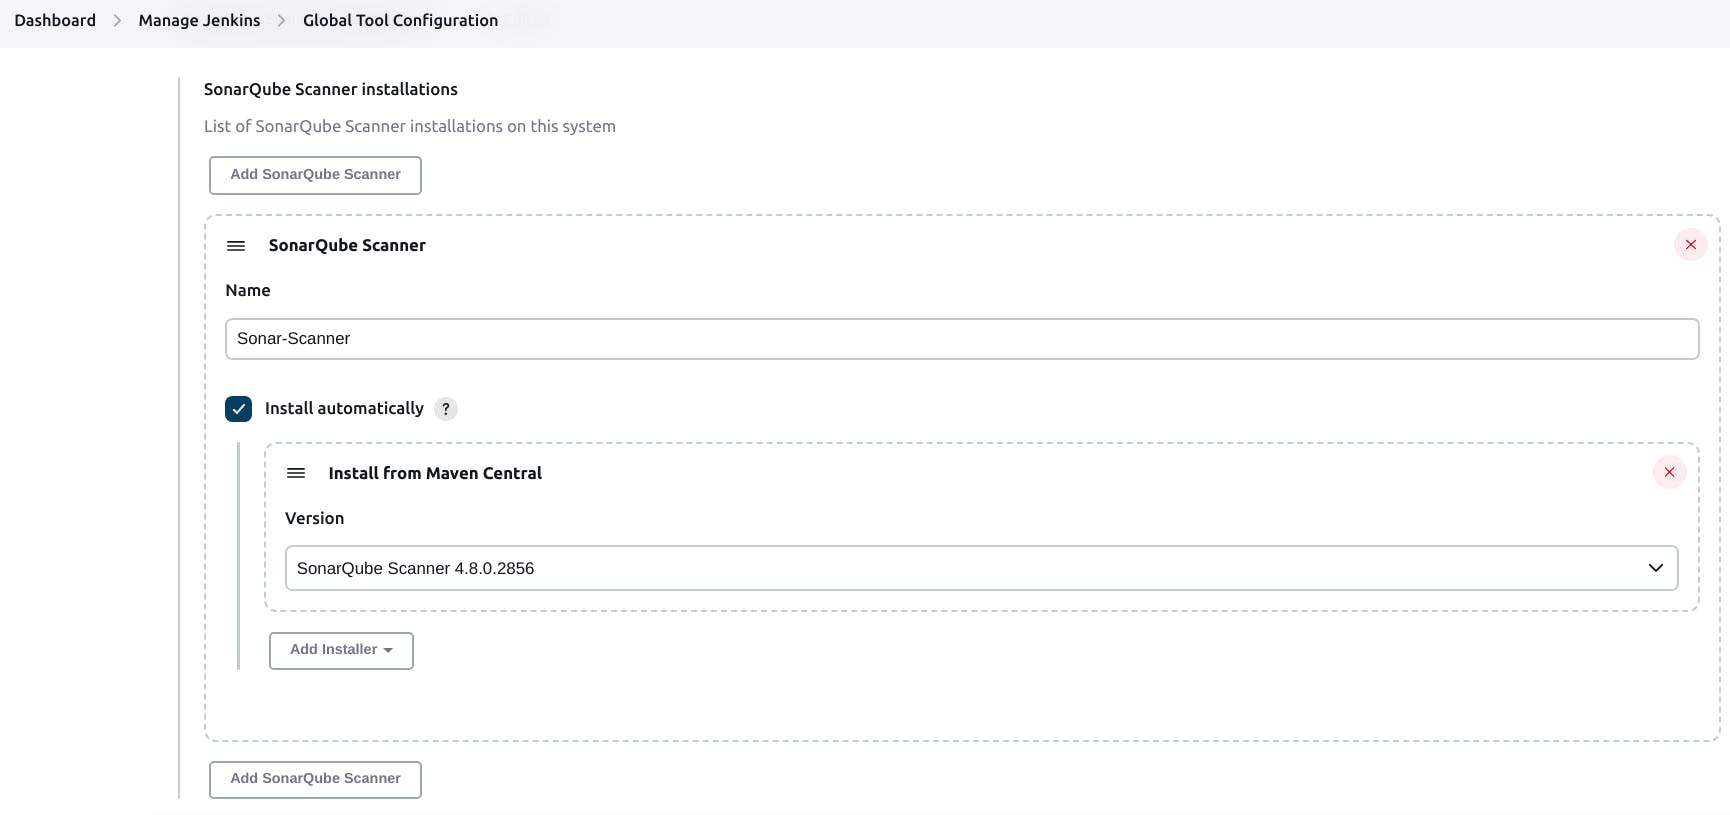
On Jenkins Dashboard click on Manage Jenkins>>Global Tool Configuration and search for SonarQube Scanner under it.
After clicking on "Add SonarQube Scanner", give a suitable name to it and check on Install automatically for its installation, and then save it.
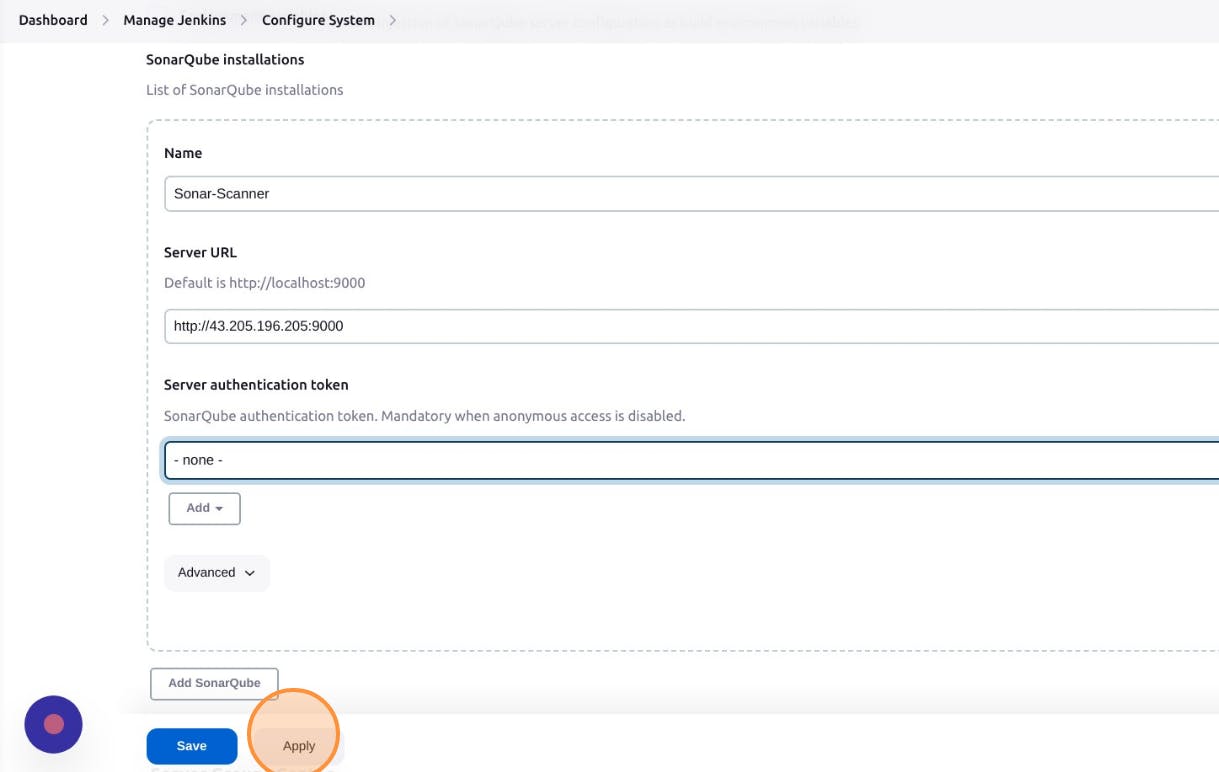
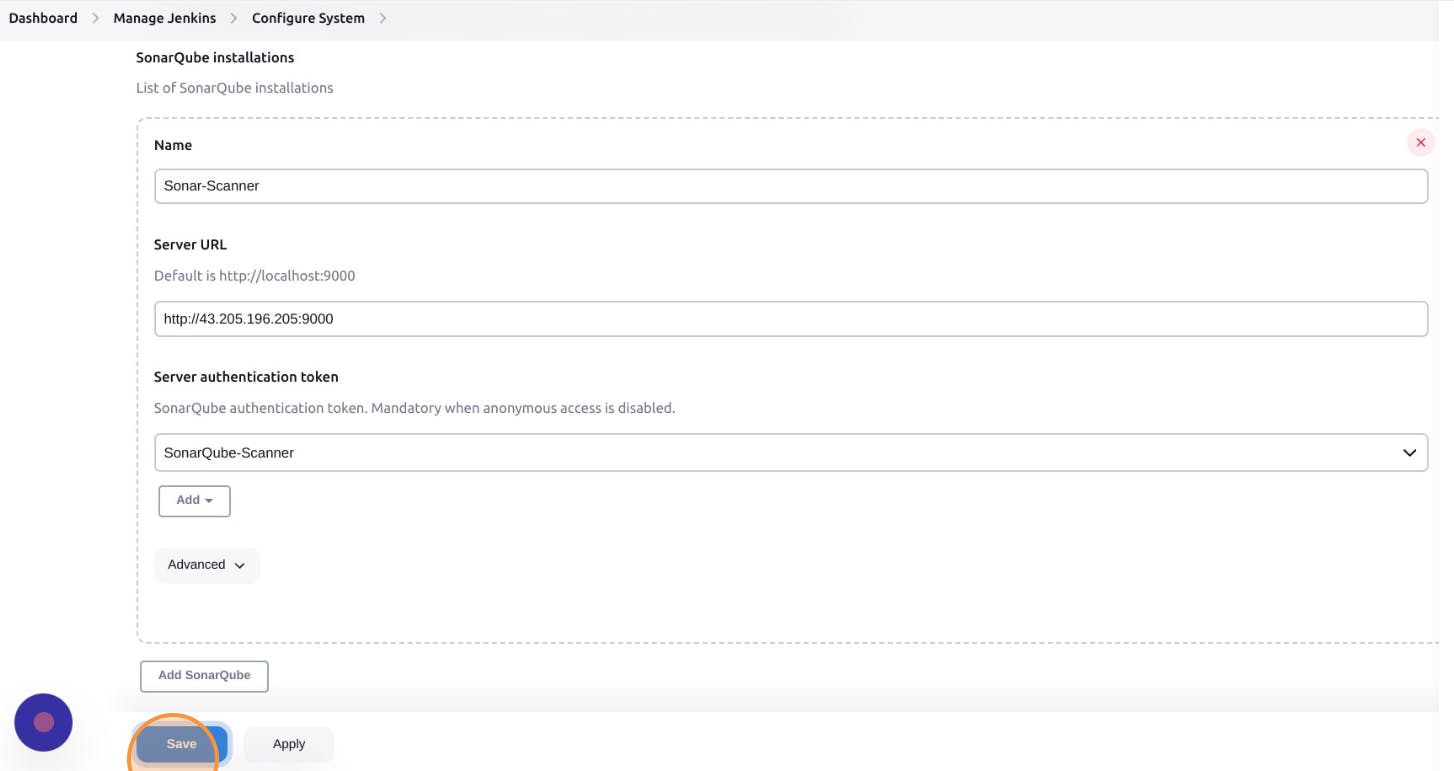
Now, on Manage Jenkins>>Configure system, search for SonarQube servers and click on "Add SonarQube"
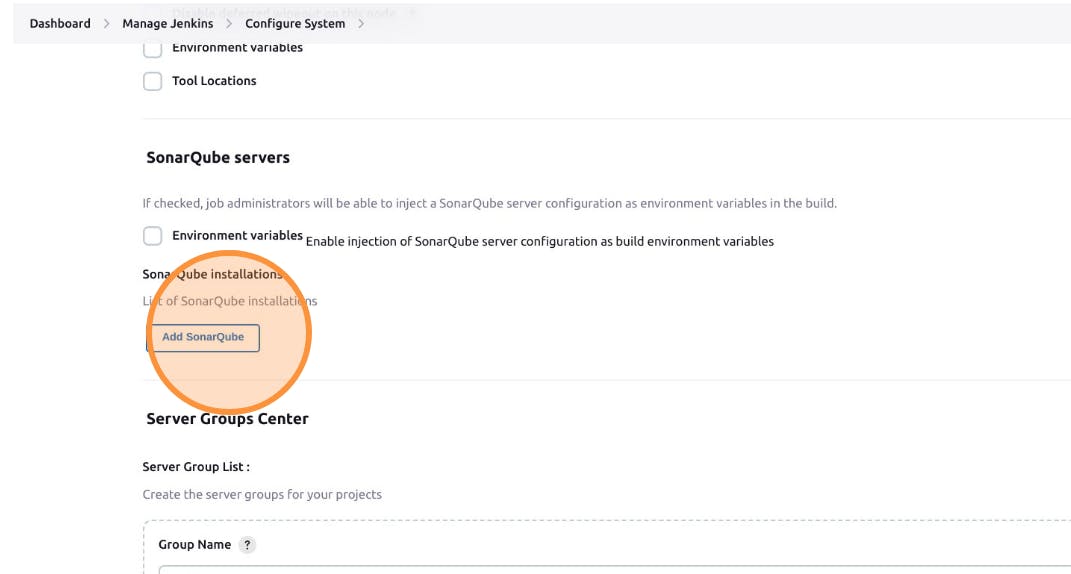
Name it accordingly, copy the Public IP of SonarQube and paste it, and put port 9000 after it in such format http://<Public IP>:9000 . Aplly & save it.
SSH2 Easy
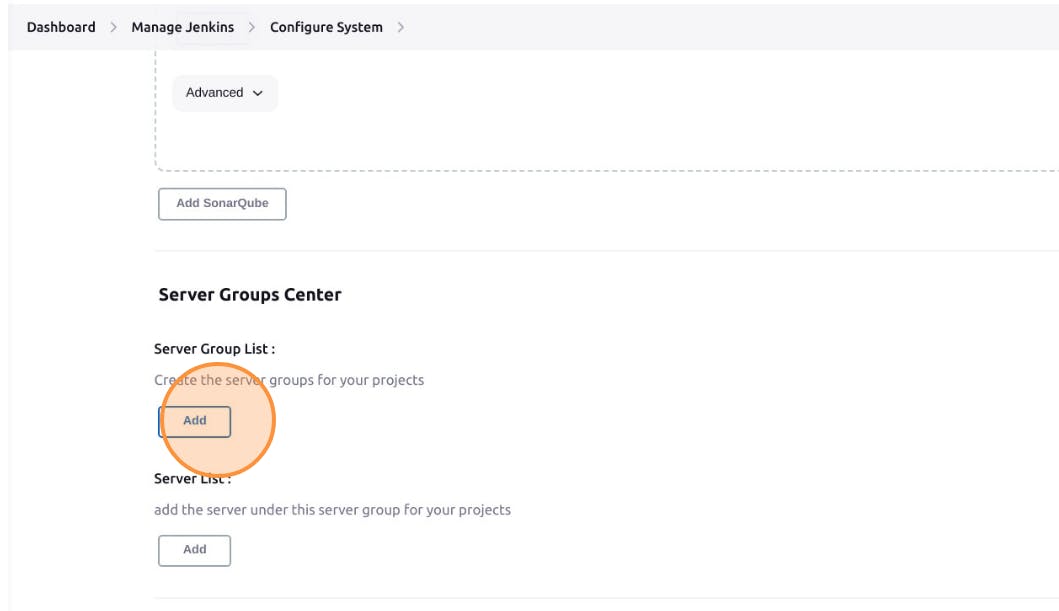
On the Jenkins dashboard, click on Manage Jenkins>>Configure System, search for "Server Groups Center" and then click on "Add" under "Server Group List"
We have to add two Server Groups here, one for Jenkins and one for Docker. Give them names Jenkins-Server and Docker-Server respectively.
Change their UserName from root to ubuntu, and give the password for this which you set earlier in the terminal for ssh authentication.


Apply and save it, and again come back here to add server sites.
Now, search for "Server List" under Manage Jenkins>>Configure System>>Server Groups Center and click on "Add" to list the servers.
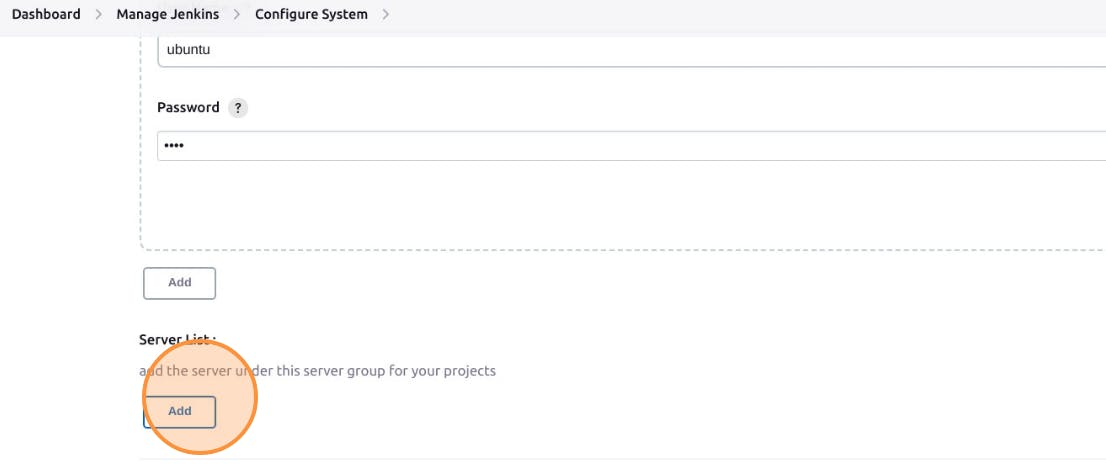
Here also, you have to add two server sites, one for Jenkins and one for Docker. Give them a name accordingly, and mention the Public IPs of Docker and Jenkins in their respective Server Groups.
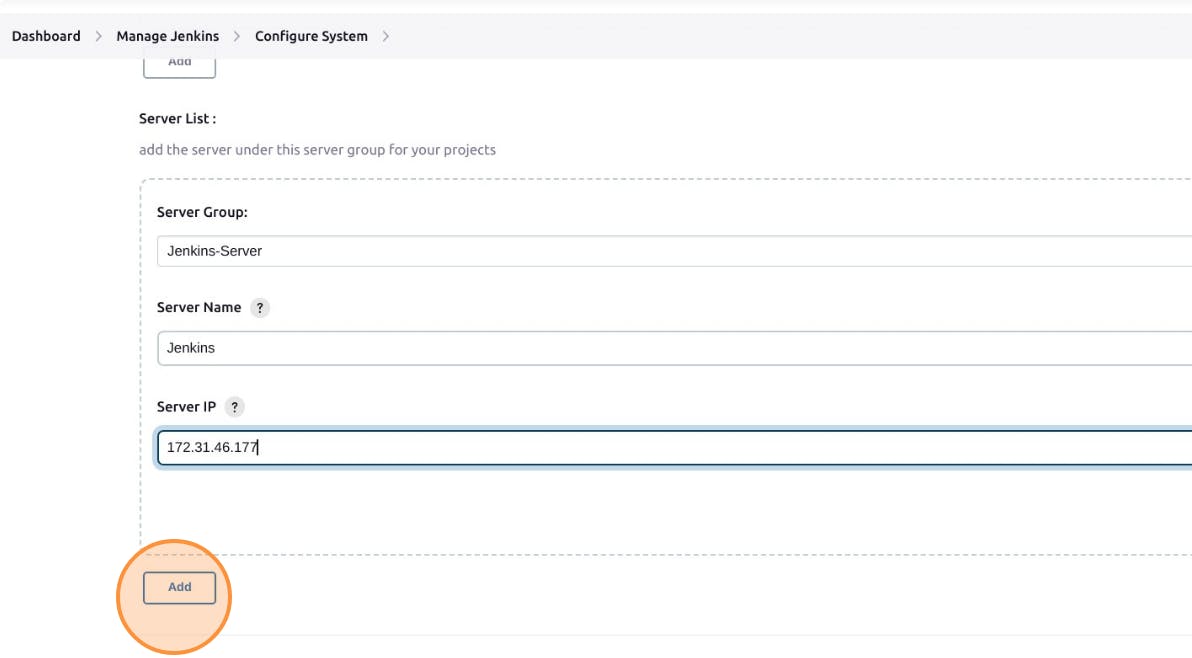
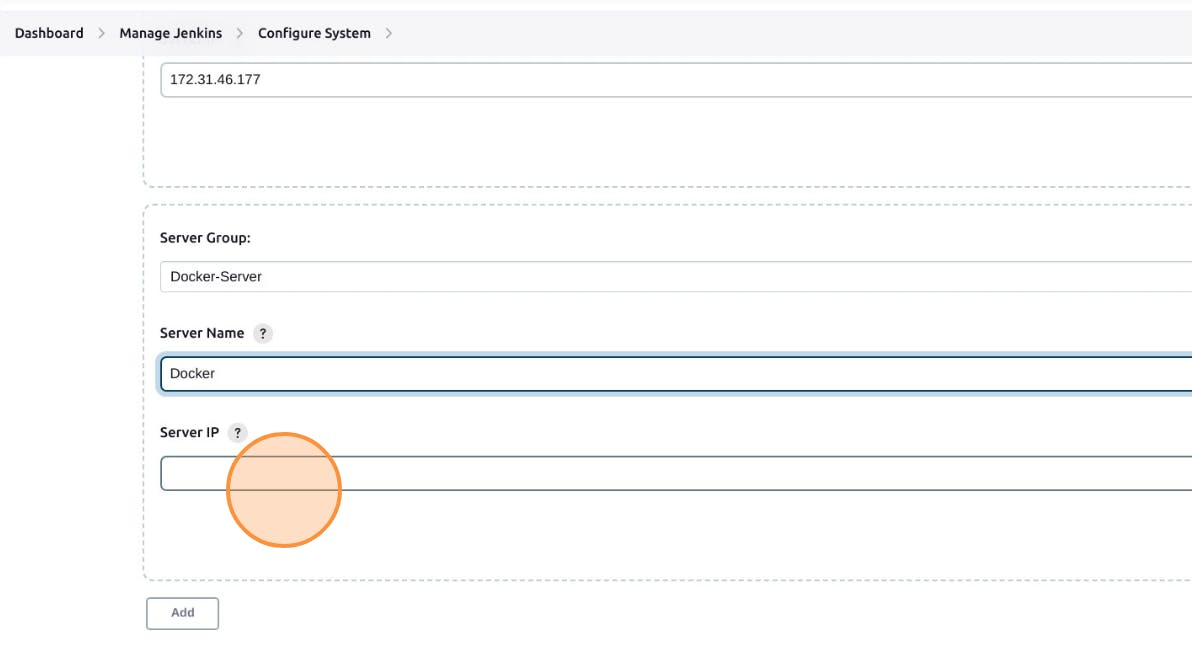
Apply and save it. We are done managing plugins.
Finally, we will build our CI-CD Pipeline for our simple HTML project(Netflix Clone).
Create a Jenkins Job for Deploying our Web Application
On the Jenkins Dashboard, click on "Create a Job".
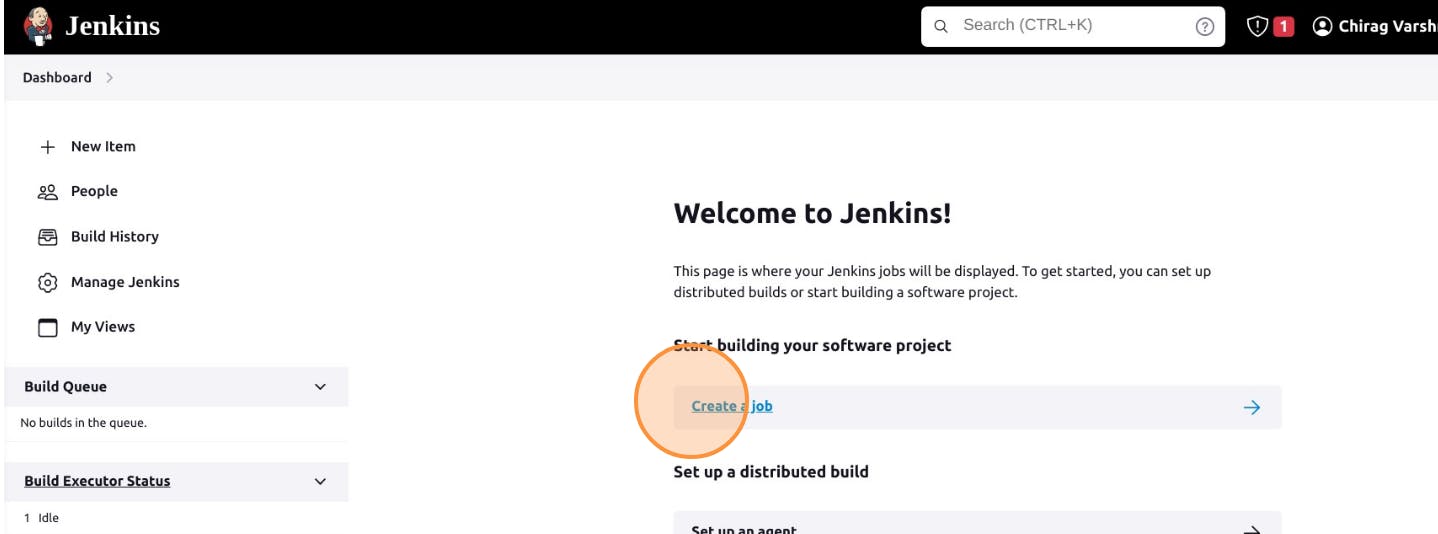
Give it a name, select the type of pipeline you want to create, and then click "OK".

Under the configuration setting, select "Git" for Source Code Management. Copy and paste the git link from the GitHub repository.
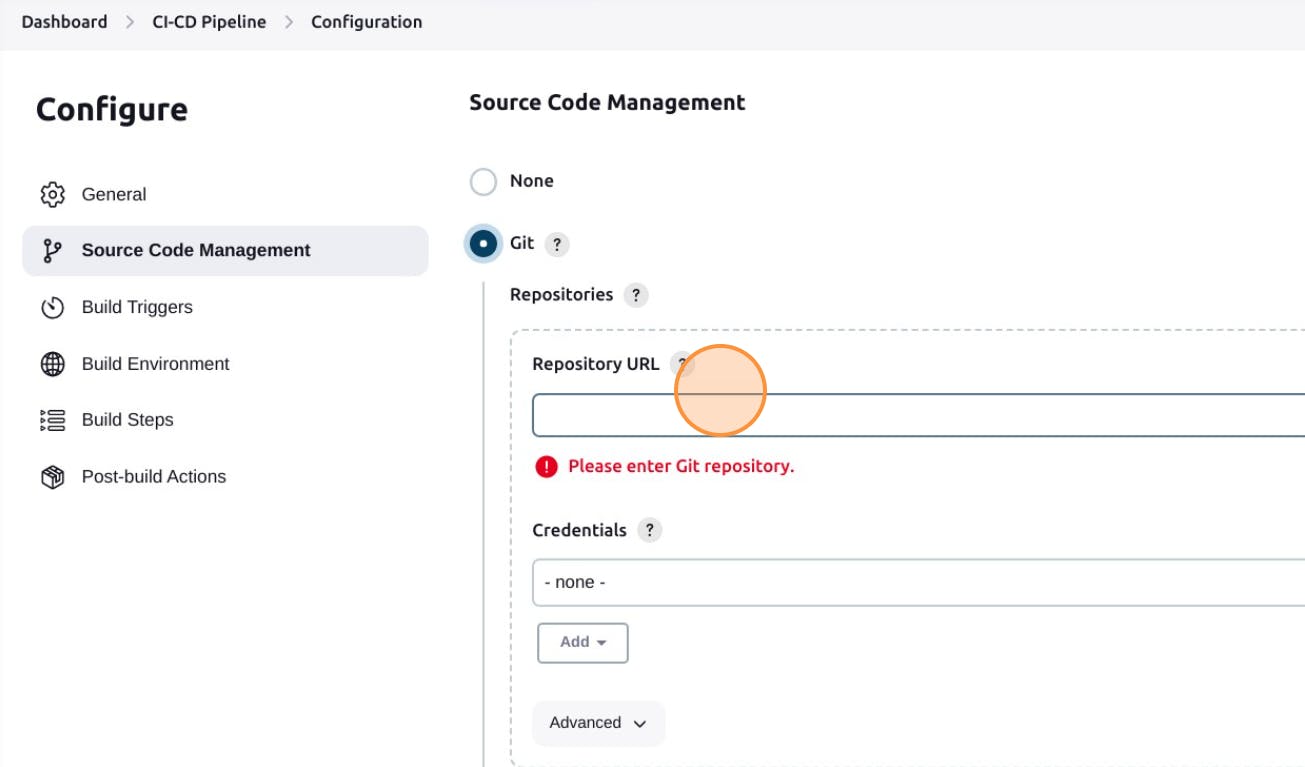

Specify the branch you want to build and deploy.

To automate the pipeline i.e. automatically triggering the build process when new changes got pushed to the GitHub. This will build an automated pipeline between a Programmer and Jenkins Pipeline.
For this, we have to check this Build trigger - "GitHub hook trigger for GITScm polling"
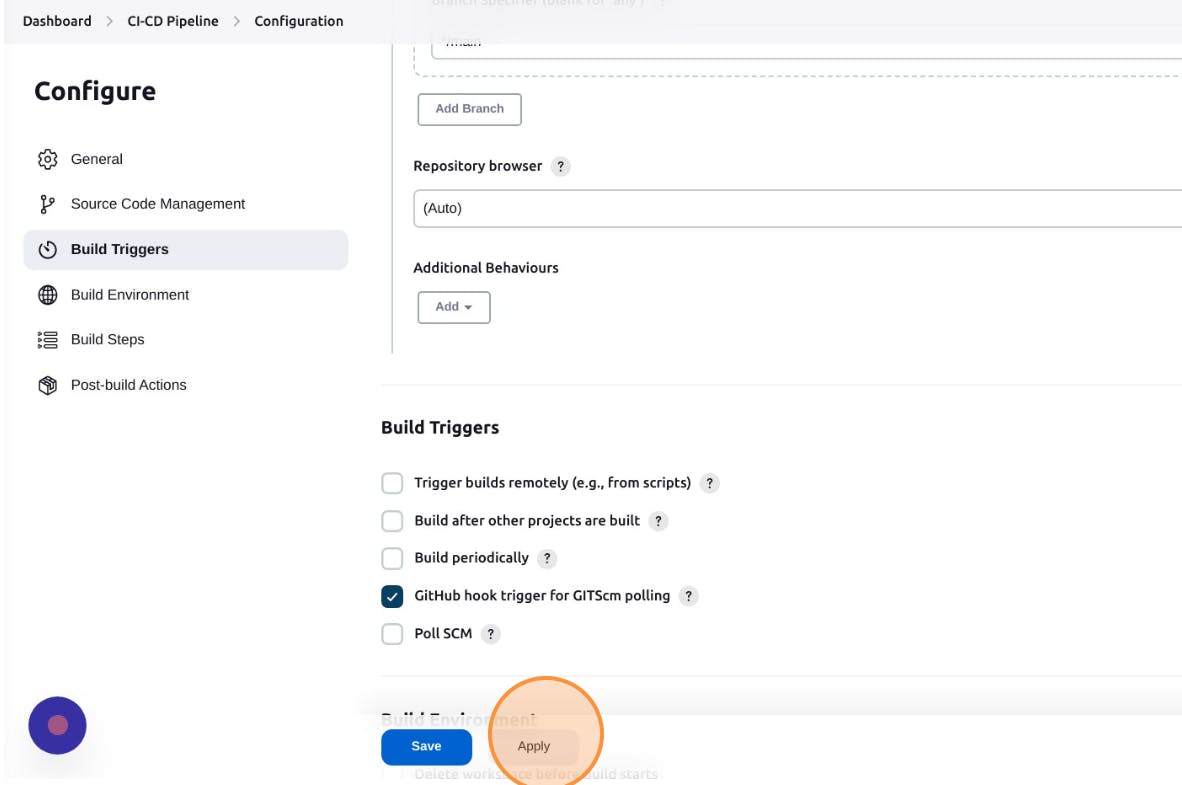
Click apply and save.
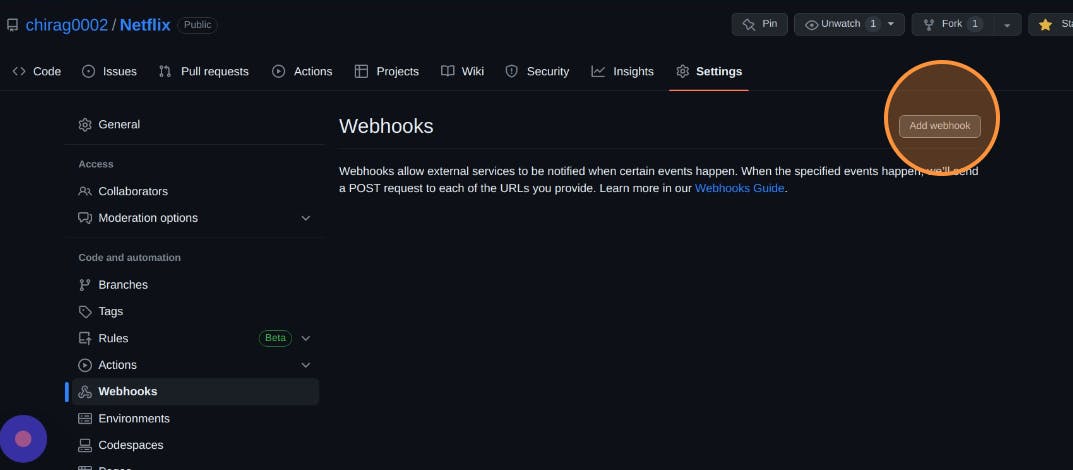
Now head over to your GitHub repo and click on settings>>webhooks and then click on "Add webhook".
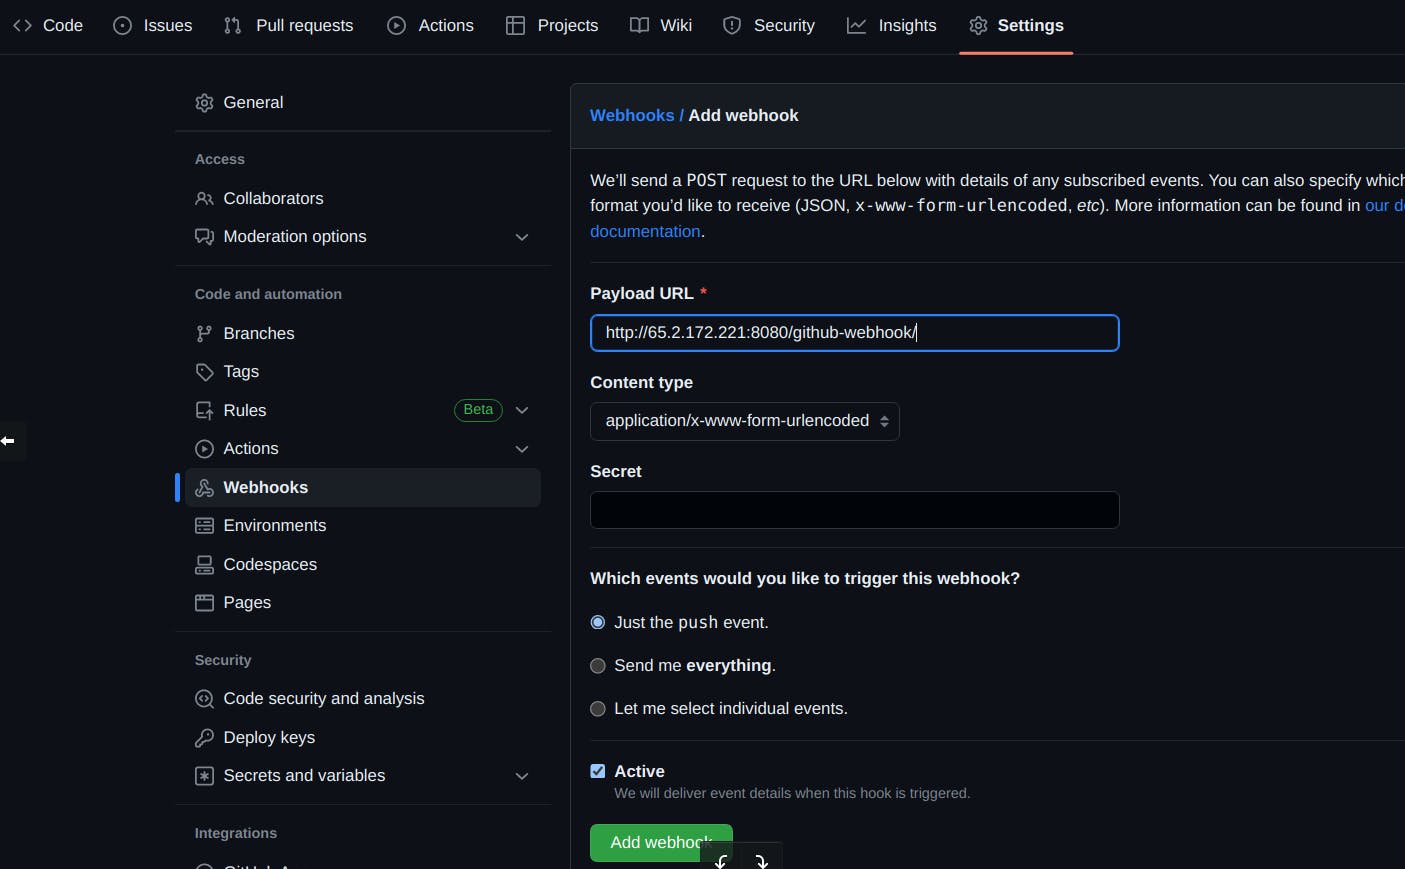
Give the URL in the following format http://<Public IP of Jenkins>:8080/github-webhook and click on "Add webhook" to save it.
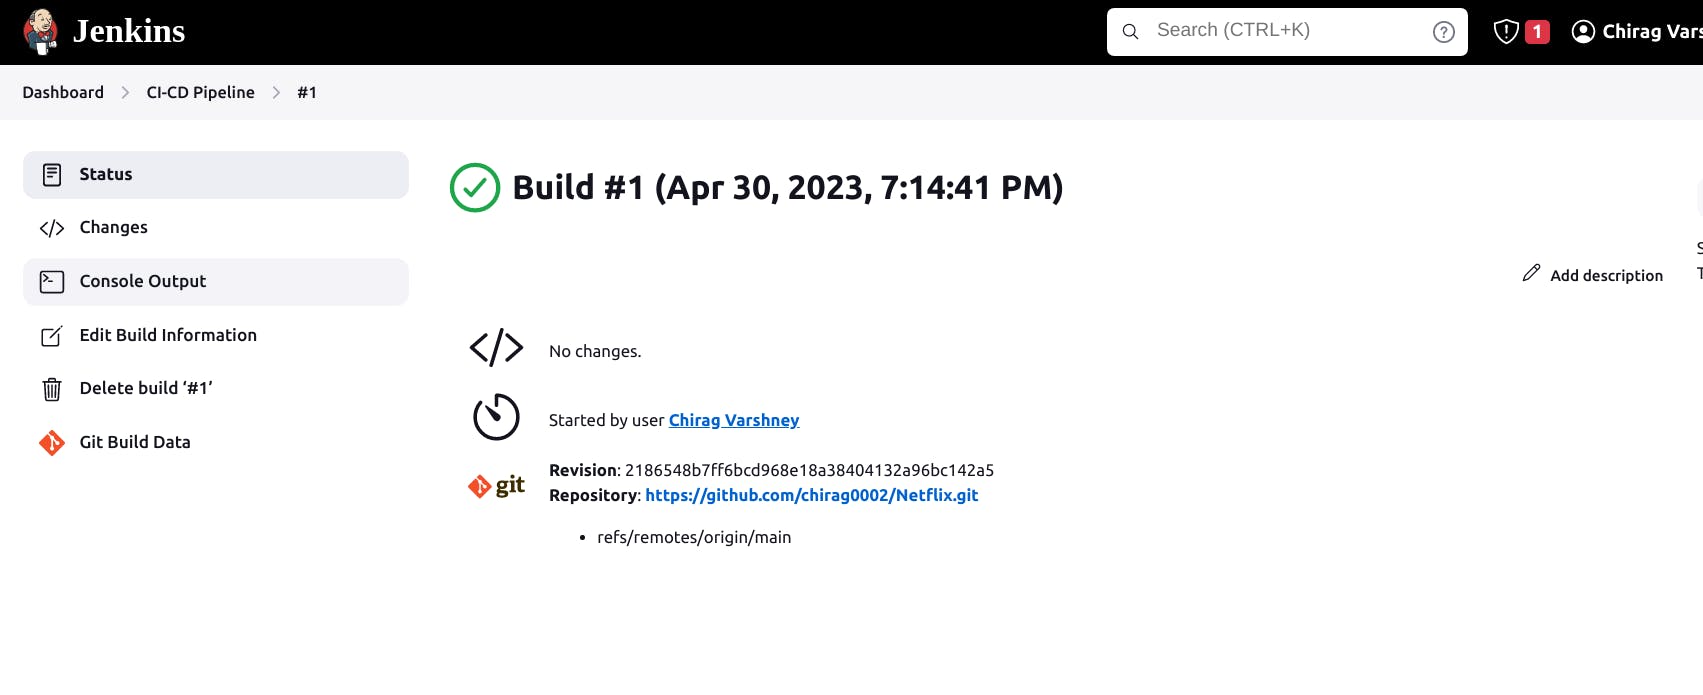
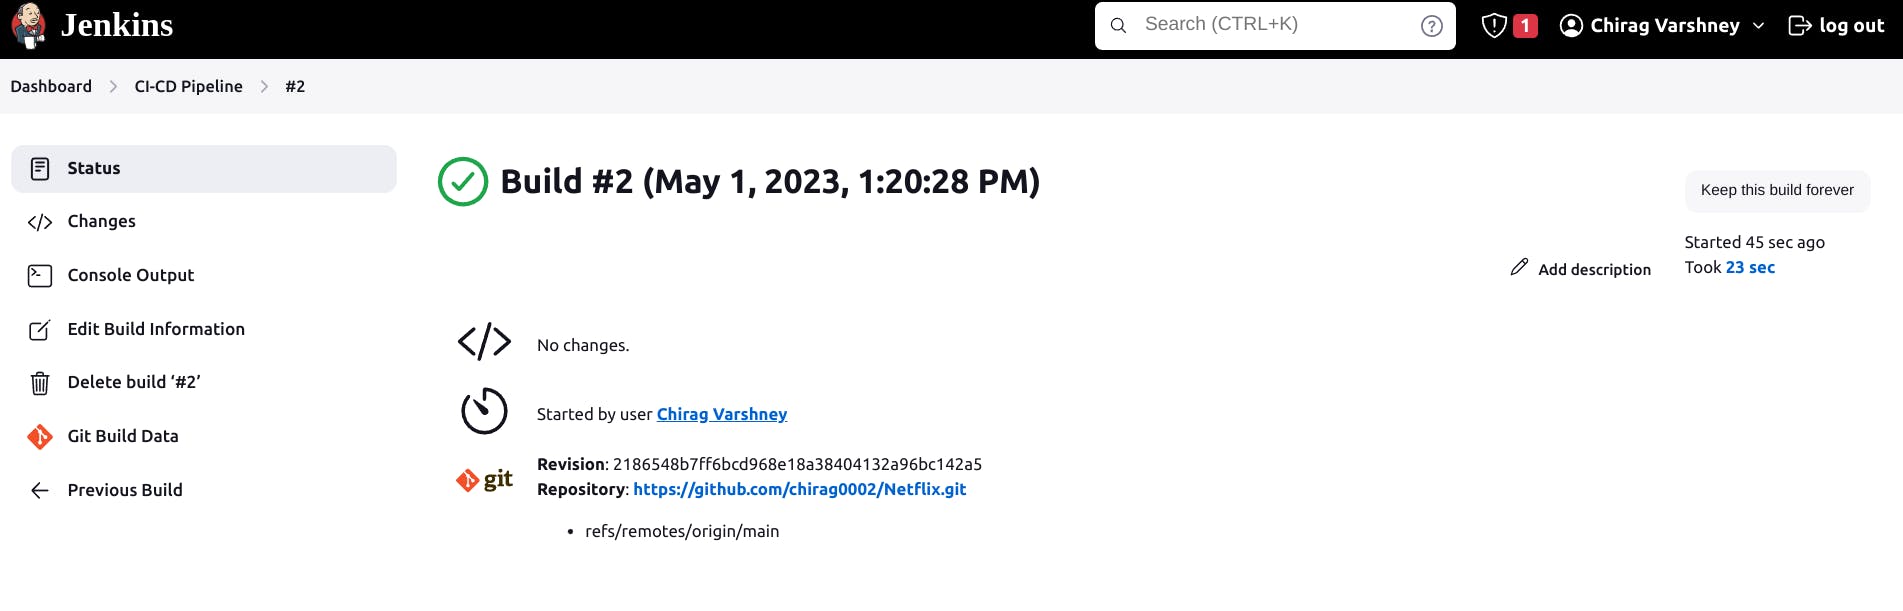
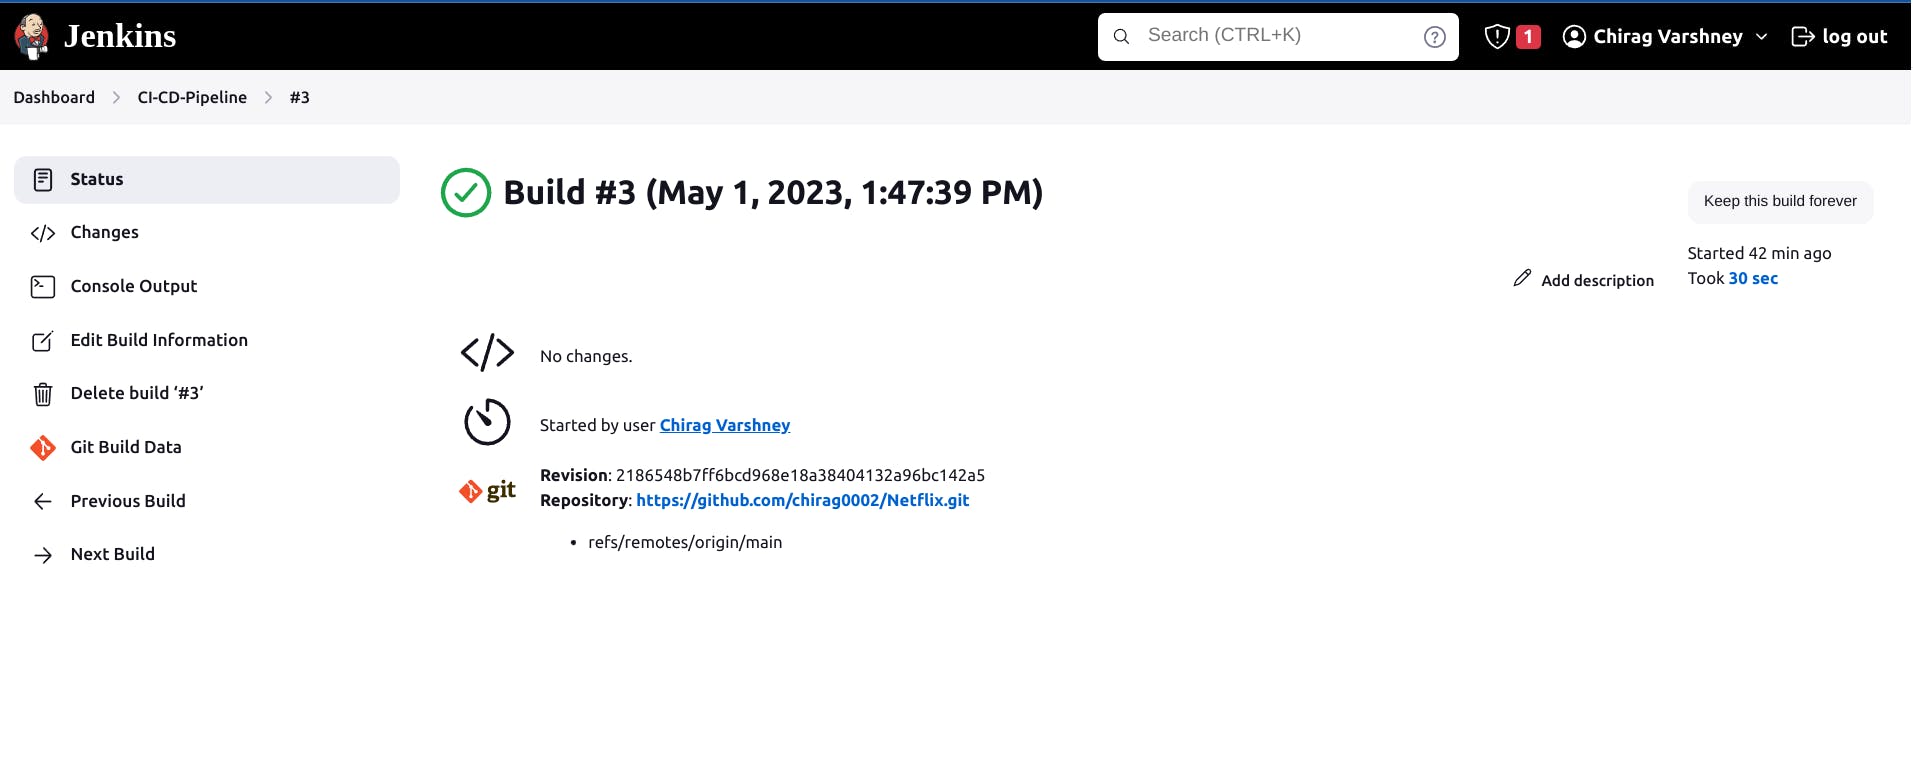
Now, on Jenkins Dashboard Under CI-CD Pipeline click on "Build Now" to start the build process.
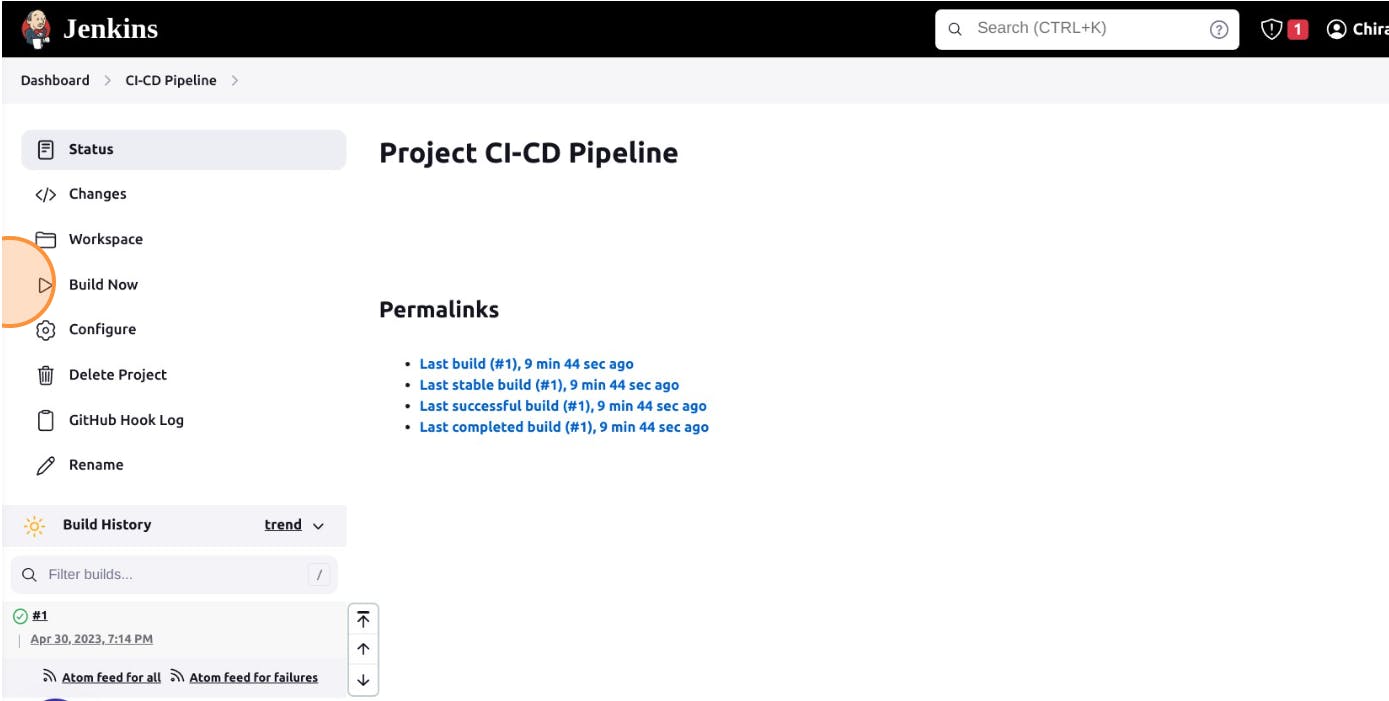
If everything works fine, you will see the success status of your build.
Configuring Pipeline for SonarQube
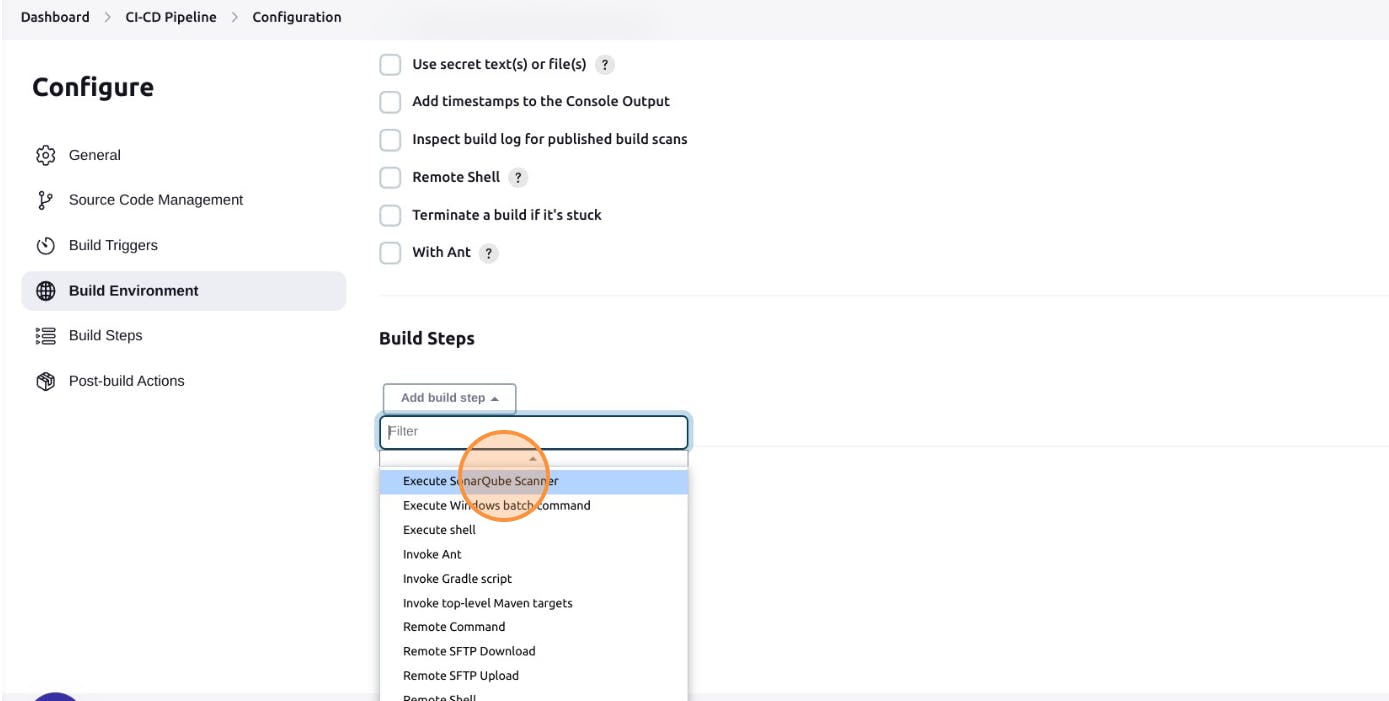
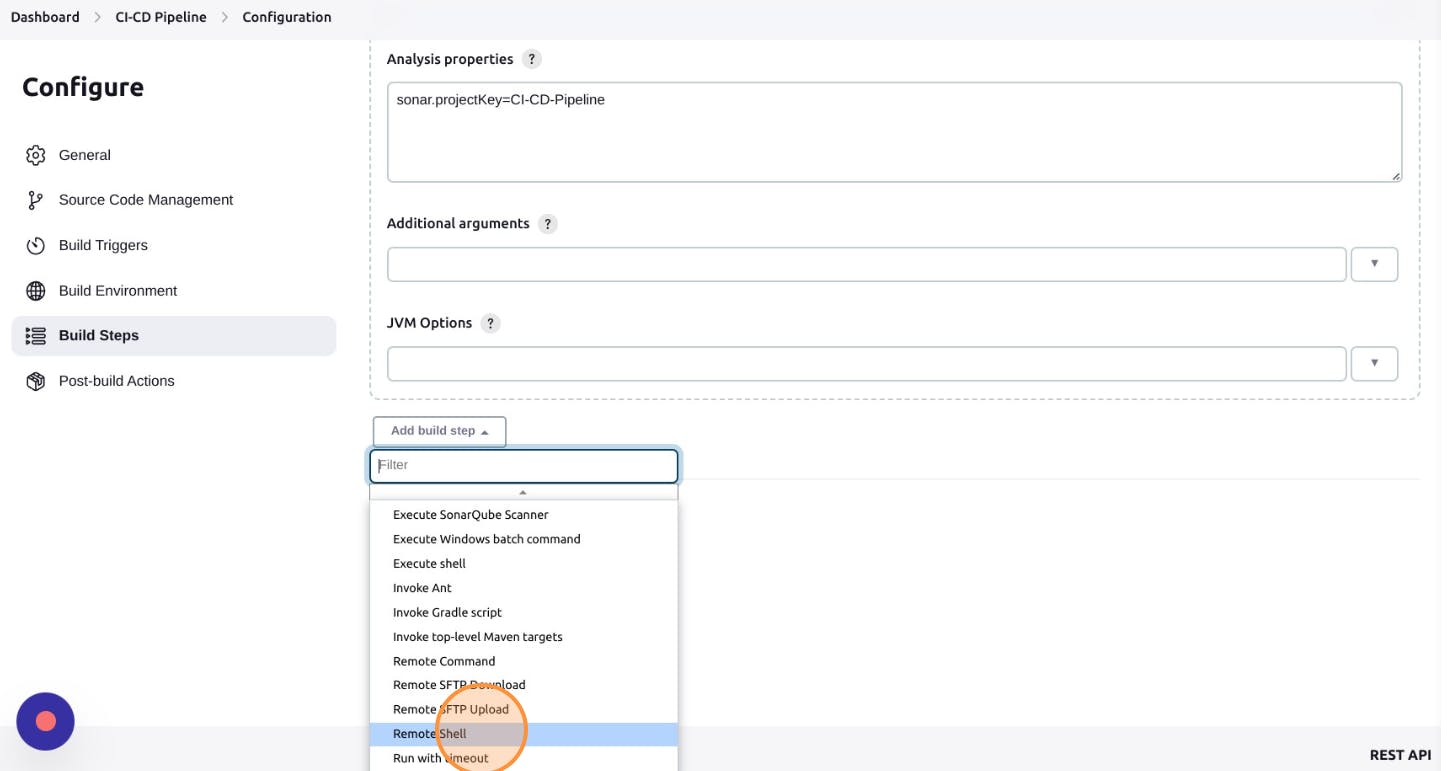
Under the CI-CD Pipeline, click "Configure", search for Build Steps and click on "Add build step" and select "SonarQube Scanner".
Now, paste the code in the Analysis Properties field, which you copied from SonarQube which we kept saved.
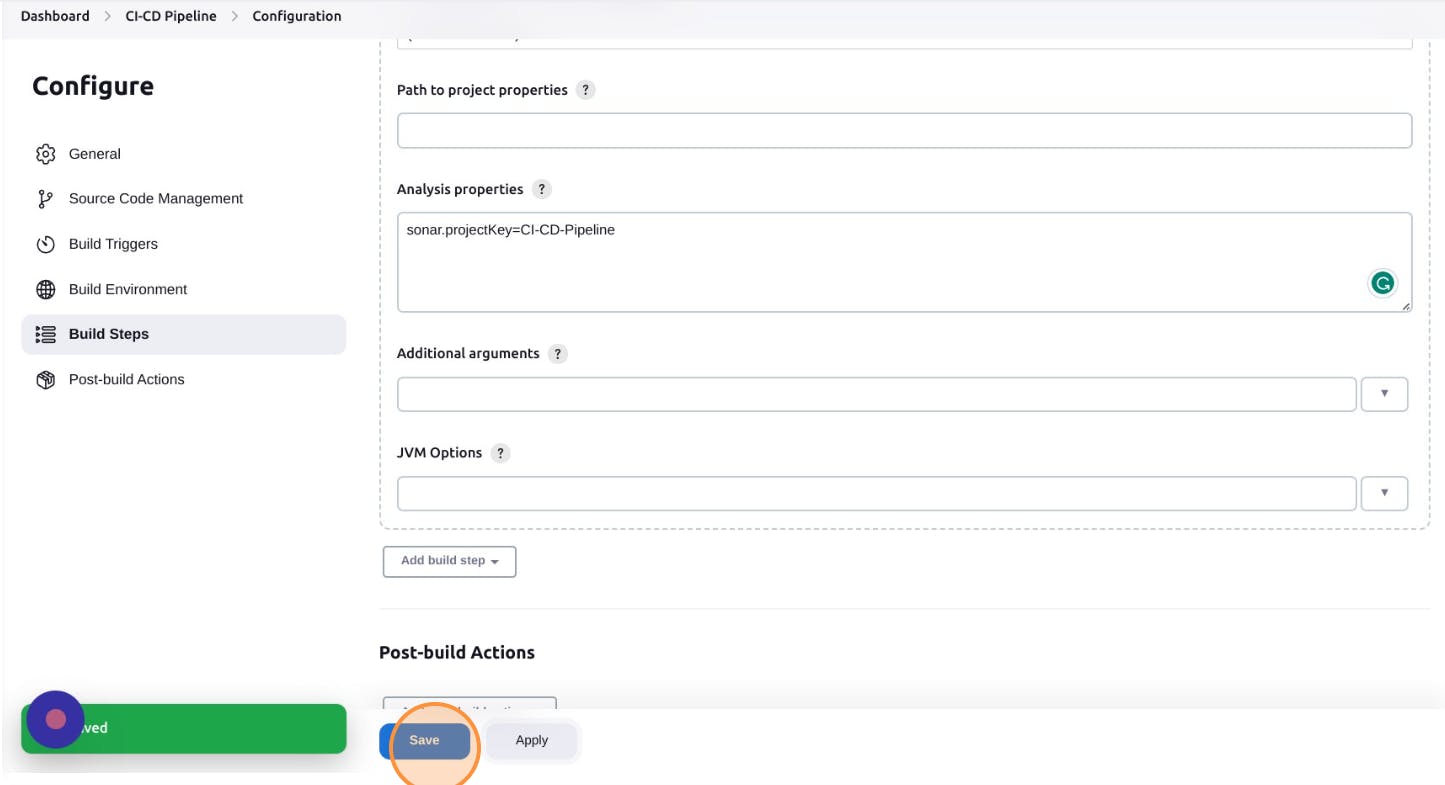
Apply and save it, and head over to Jenkins Dashboard>>Manage Plugins>>Configure System and add server authentication token for SonarQube by clicking on "Add", and selecting Jenkins.
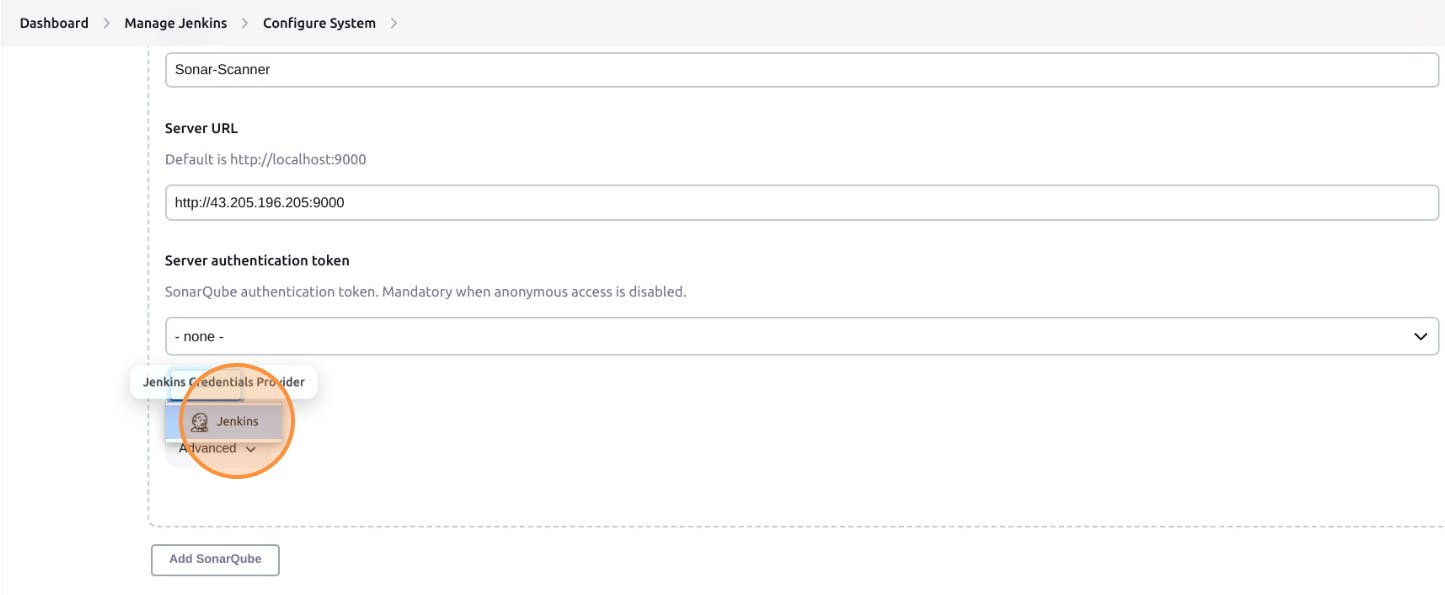
Change Kind to secret text and paste the secret token key which we copied earlier and saved it. Give it an ID name accordingly.

Now, for the server authentication token, from the scroll bar select the ID name, the one which you just created.
Now, under the CI-CD Pipeline, click "Build Now".You will see-success if all things work fine.
Before clicking on Build Now, you have to start the SonarQube by running these commands in the SonarQube instance's terminal.
cd /home/ubuntu/sonarqube-10.0.0.68432/bin/linux-x86-64
./sonar.sh console
#this will start the SonarQube on port 9000
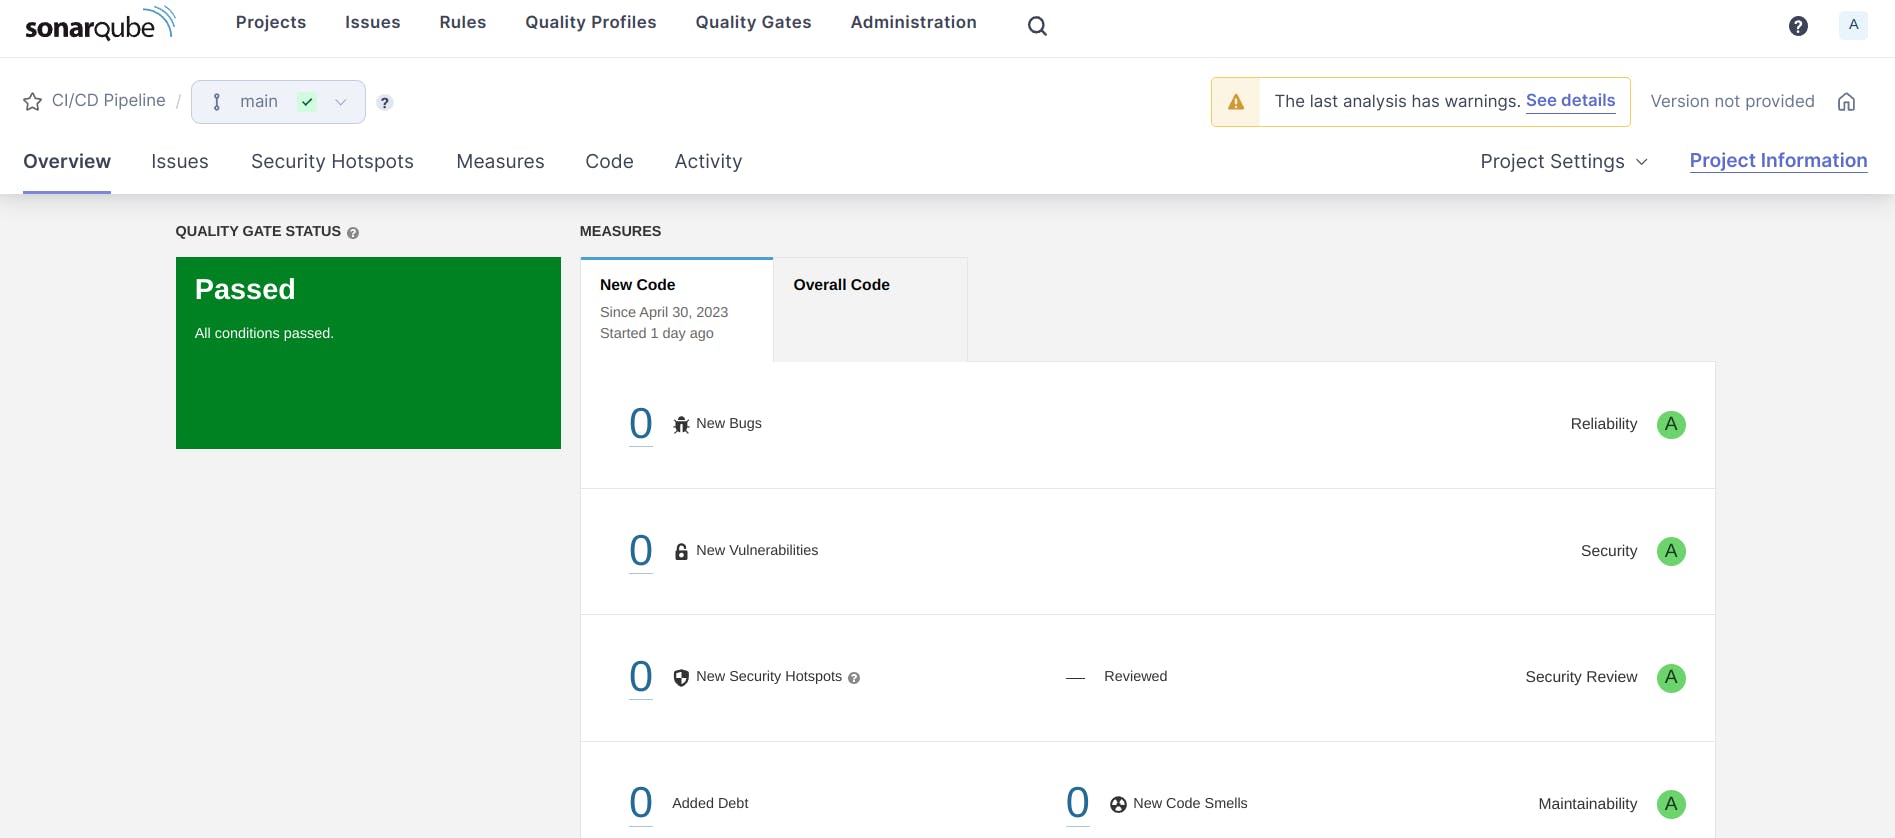
Now, our pipeline takes the code from the user through GitHub and triggers a build in Jenkins which push the code to SonarQube to analyze the code quality.
Configuring Pipeline for Docker
We want to build a docker image of our application and then run it on port 3000 so that it can be accessed and be in a running state.
First, ssh into your Docker instance through the terminal and create a folder website for storing the source code and building the Docker image.
mkdir website
Now, under the CI-CD Pipeline on Jenkins Dashboard click on "Configure", search for Build Steps, and select remote shell.
We are using Remote Shell because we want to run commands in Docker from Jenkins.
Earlier the SSH connection that we set up between Jenkins to Jenkins and Jenkins to Docker is for this only.
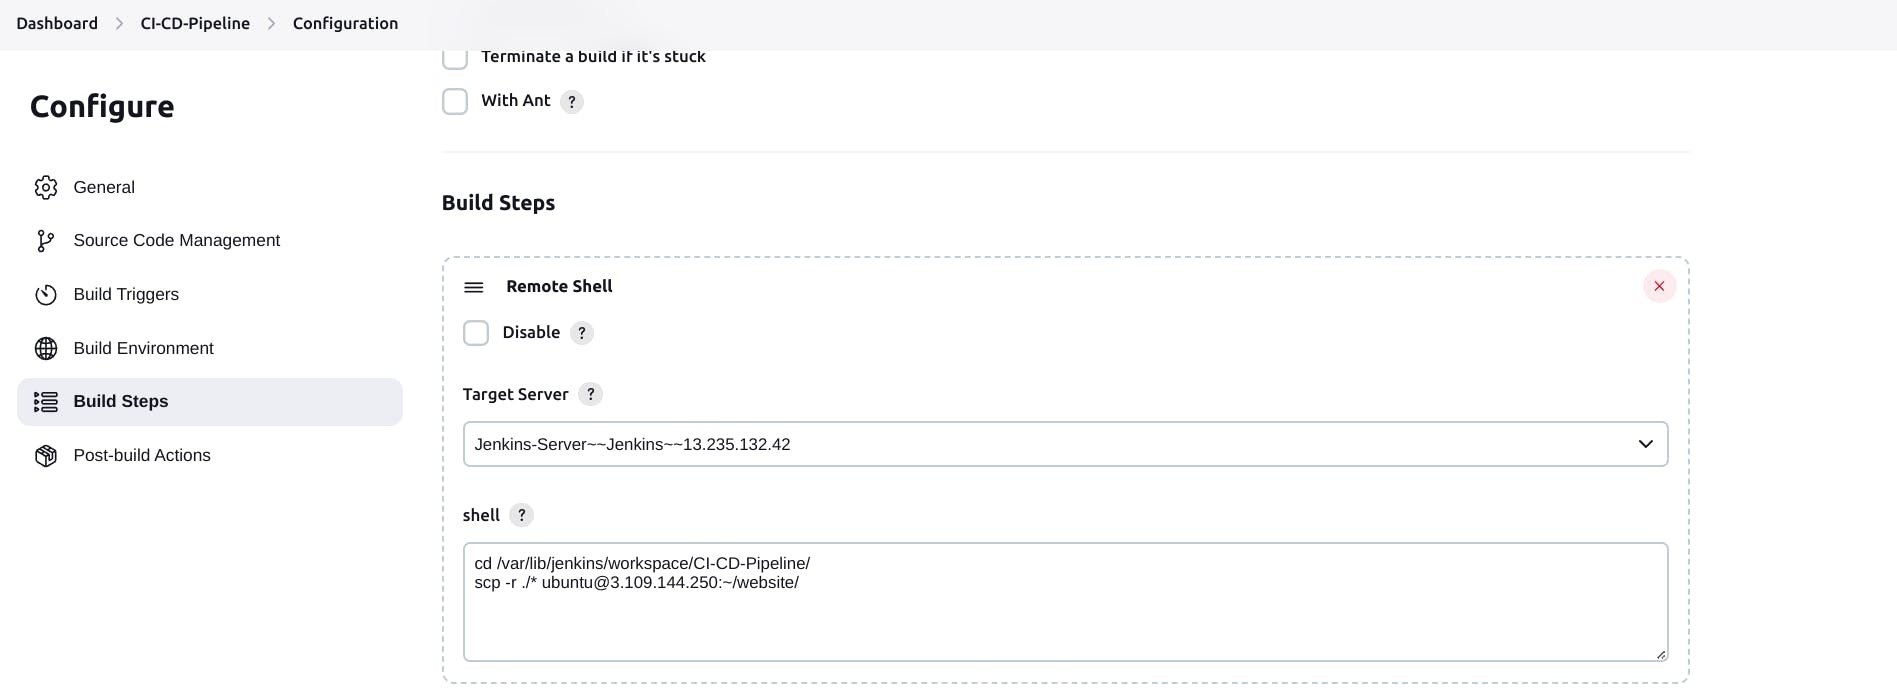
Now first, we target Jenkins Server for copying the source code from the Jenkins workspace to Docker Server inside the website folder that we just created.
cd /var/lib/jenkins/workspace/CI-CD-Pipeline/
scp -r ./* ubuntu@65.1.131.68:~/website/
#this command securely copy all the code from the directory - CI-CD Pipeline and paste it to this following destination - ubuntu@65.1.131.68:~/website/
Add another remote shell, this time for targeting the Docker server for building and running the image.
cd website/
docker build -t netflix .
docker run -d -p 3000:3000 --name NETFLIX netflix
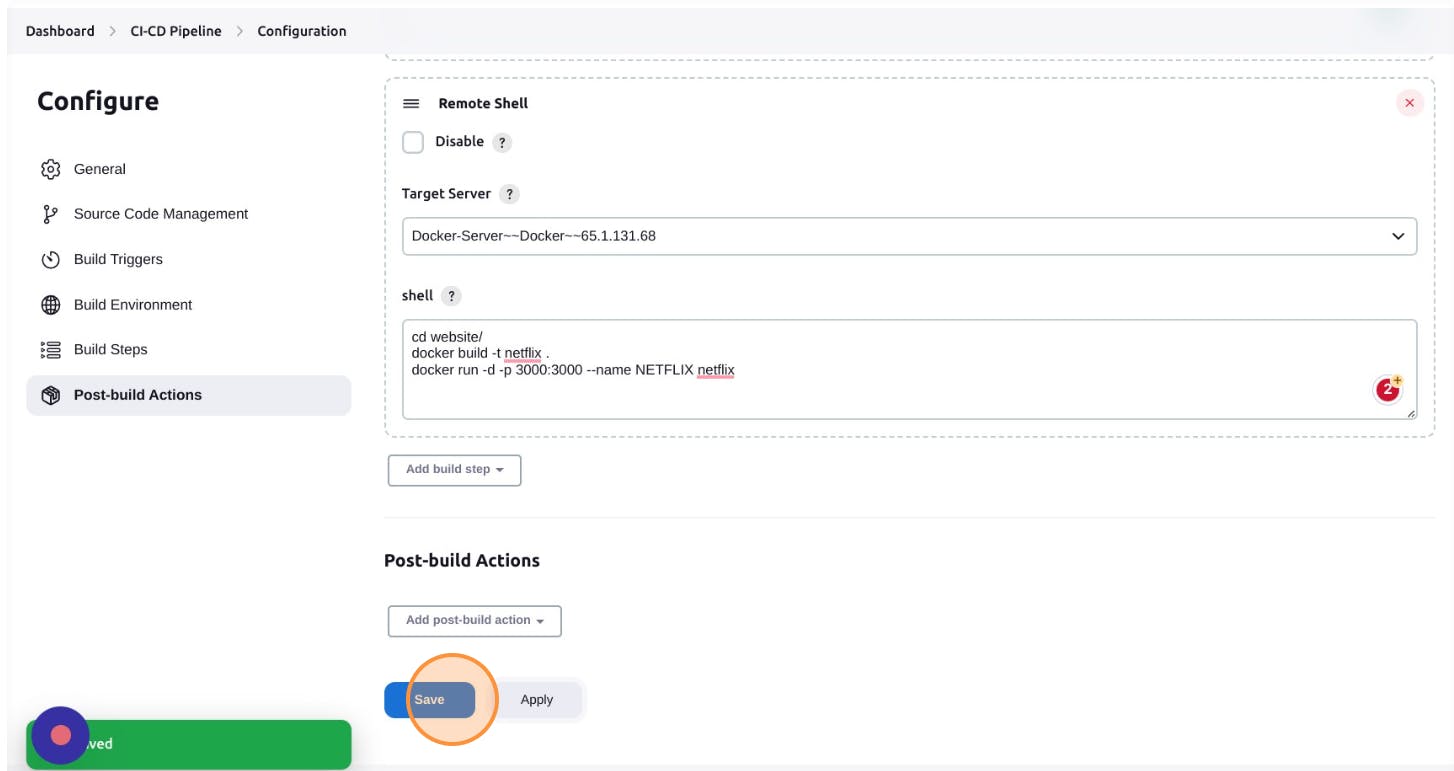
Apply and save it.
If everything works fine, then you'll see success. Here is our live website working on Port 3000 on Docker.

Now, you can also verify the pipeline by pushing some new changes to the GitHub repo, it will automatically trigger a new build process, analyze the code by sending the code to SonarQube and the docker image will re-build and, the changes will reflect on Port 3000 of the Docker instance.
This completes our automated CI-CD Pipeline here.
Conclusion
In this blog, we learned about how to build a CI/CD Pipeline using AWS, Jenkins, SonarQube, and Docker. It helps us to automatically build, test, analyze, and deploy our web applications. Cheers to us 🥳.
I have tried to take it very beginner friendly, but if you have any doubts regarding this, feel free to DM me.
Don't forget to like and share this blog if you liked it. Connect with me on Twitter for getting updates on more such blogs.
THANKS FOR READING !!😁✌️